opnsense
OPNsense (Firewall cluster)
v24.7OPNsense® is an open source HardenedBSD based firewall and routing platform.
Firewall cluster opn-cluster gives routing, firewall, DHCP, DNS and VPN services inside cSkyLab.
Prerequisites
To learn more about OPNsense® check official documentation at https://docs.opnsense.org/
Interfaces and IP addressing
| Interface | Network | Purpose / Machine | Subnet / IP Address |
|---|---|---|---|
| vtnet0 | br_sys | Base services and management access | 192.168.80.0/24 |
| opn-cluster VIP | 192.168.80.1 | ||
| opn-main (Private address) | 192.168.80.2 | ||
| opn-aux (Private address) | 192.168.80.3 | ||
| vtnet1 | br_wan | External network | VIP (Static) |
| opn-main (Private address) | DHCP | ||
| opn-aux (Private address) | DHCP | ||
| vtnet2 | br_sys_pfsync | cluster synchronization network | 192.168.81.240/29 |
| opn-main (pfsync address) | 192.168.81.241 | ||
| opn-aux (pfsync address) | 192.168.81.242 | ||
| vtnet3 | br_mod_srv | cSkyLab model services | 192.168.82.0/24 |
| opn-cluster VIP | 192.168.82.1 | ||
| opn-main (Private address) | 192.168.82.2 | ||
| opn-aux (Private address) | 192.168.82.3 | ||
| vtnet4 | br_pro_srv | Published services | 192.168.83.0/24 |
| opn-cluster VIP | 192.168.83.1 | ||
| opn-main (Private address) | 192.168.83.2 | ||
| opn-aux (Private address) | 192.168.83.3 | ||
| vtne5 | br_usr | User client access subnet | 192.168.84.0/23 |
| opn-cluster VIP | 192.168.84.1 | ||
| opn-main (Private address) | 192.168.84.2 | ||
| opn-aux (Private address) | 192.168.84.3 | ||
| vtnet6 | br_setup | External LAN | (No VIP static address) |
| opn-main (Private address) | DHCP | ||
| opn-aux (Private address) | DHCP |
Machines in the cluster:
- https://opn-main.cskylab.net - (Virtual machine on host kvm-main)
- https://opn-aux.cskylab.net - (Virtual machine on host kvm-aux) (On kvm-main if kvm-aux not present)
System requirements
The recommended specification to run all OPNsense standard features, means every feature is functional and fits most use cases.
| Hardware requirements | |
|---|---|
| Processor | 1.5 GHz multi core cpu |
| Memory | 8GB |
| Disk | 120 GB SSD |
VIP password
Use the following password to create VIP addresses: NoFear21
How-to guides
Create cloud image from .iso file
Prerequisites:
- kvm-main host setup completed.
- Local Ubuntu Desktop machine with Virtual Machine Manager installed and ssh keys to kvm-main host.
NOTE: This procedure generates a cloud image with a full installation from an opnsense
.isoDVD. Once it's created, it will be cloned to generate any opnsense virtual machine installation. Go directly to VMachines configuration if you already have a cloud image ready to be used.
You can find more information about full installation from https://docs.opnsense.org/manual/install.html
- Download opnsense .iso file (DVD Installation) from https://opnsense.org/download/ and copy it to /srv/setup directory in your kvm host.
- Create the opnsense template
opn-tplmachine:
sudo cs-kvmserv.sh -m vm-create -i NONE -n opn-tpl \-p /srv/vmachines \-r /srv/setup/OPNsense-24.7-dvd-amd64.iso
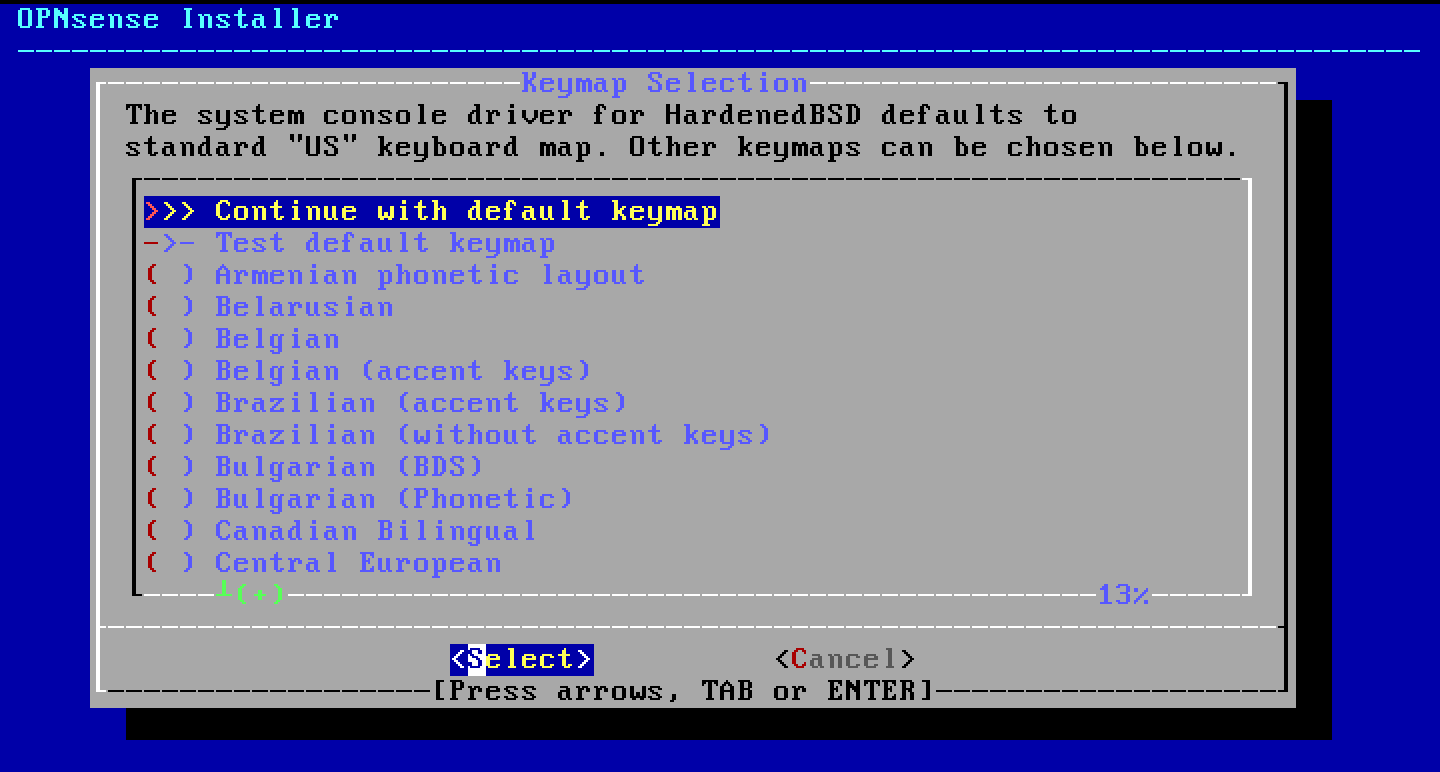
Connect to the console with
Virtual Machine Manager.Login with user
installerand passwordopnsense.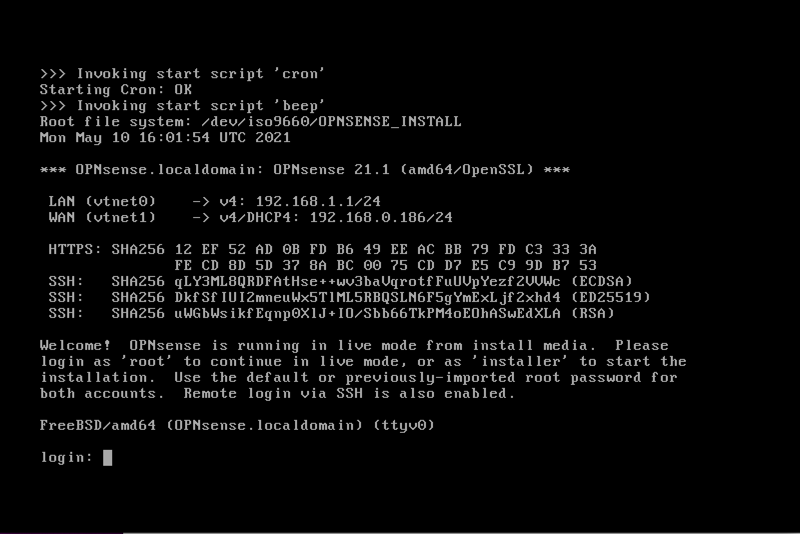
Select your Keymap

Select Install (UFS)
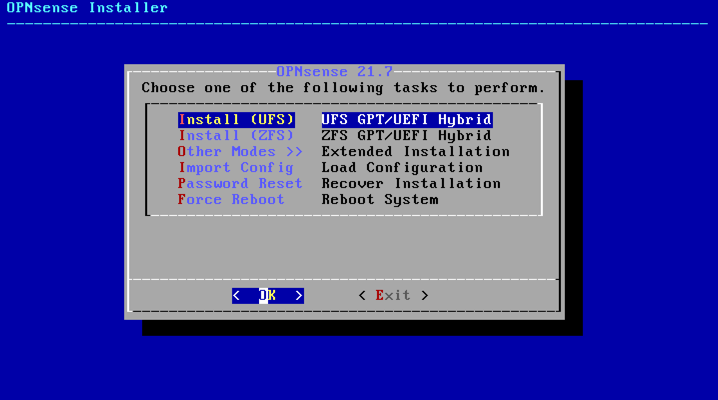
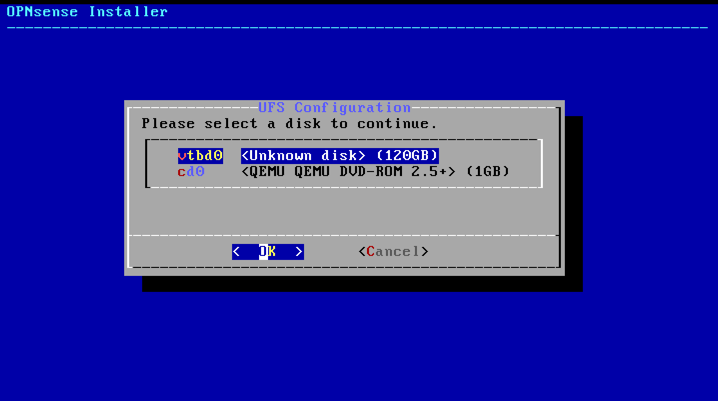
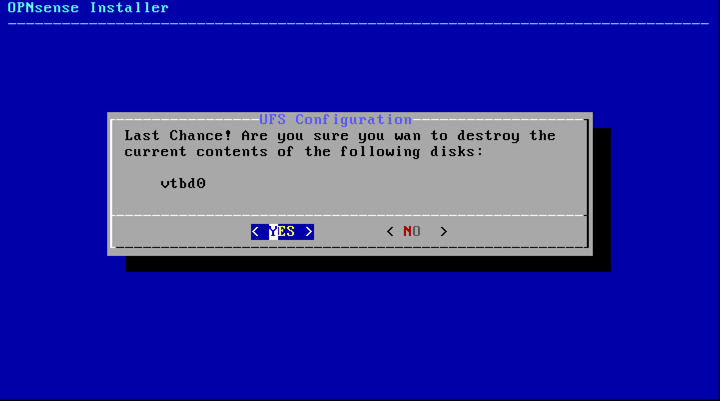
Select disk
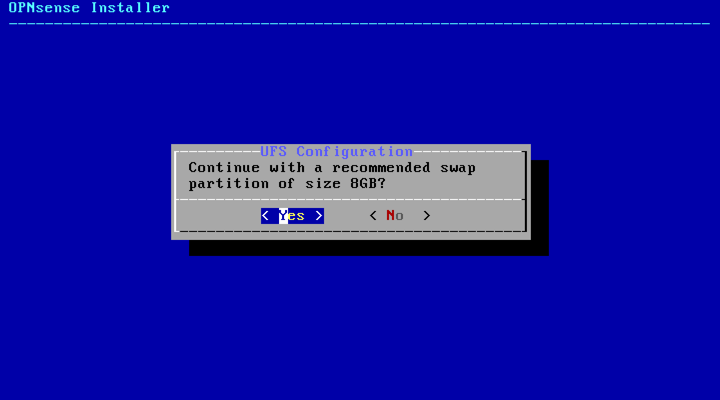
Accept recommended swap partition
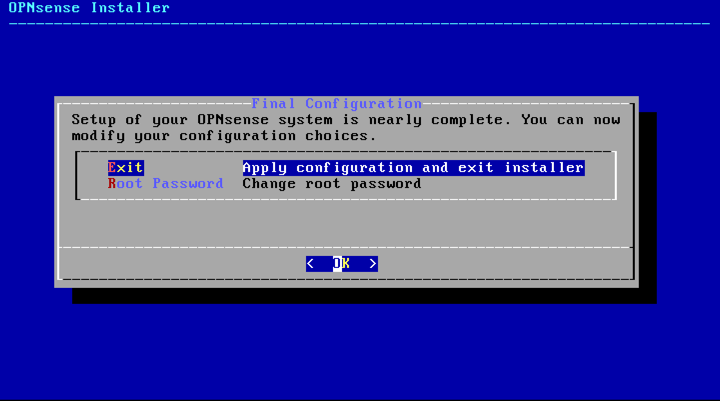
Confirm configuration
Change root password, apply configuration and exit installer
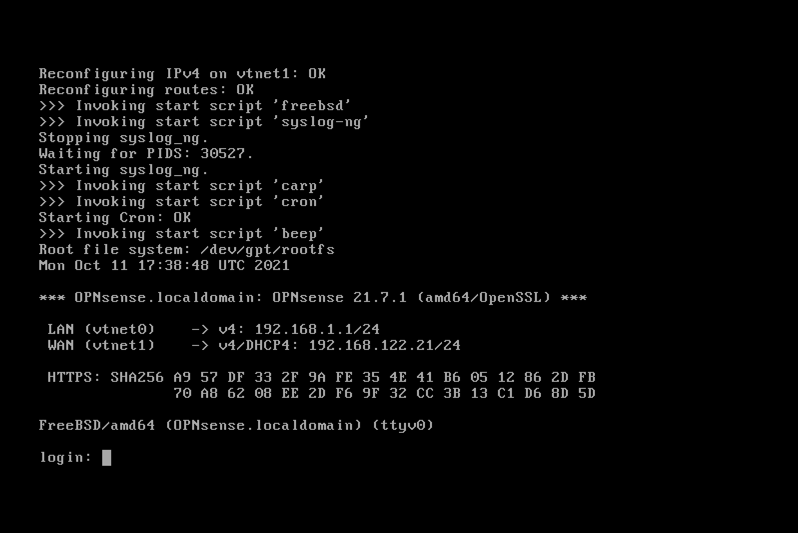
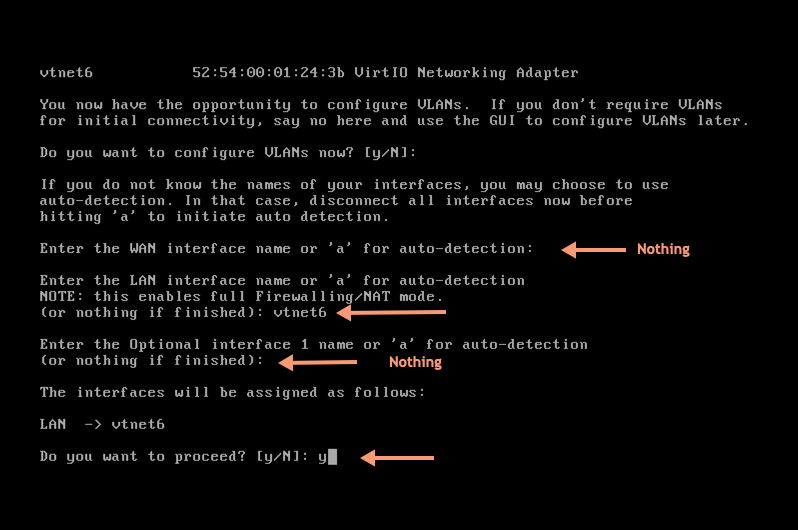
After reboot, login to reassign interface vtnet6 (br_setup) to LAN:
- Select 1) Assign interfaces
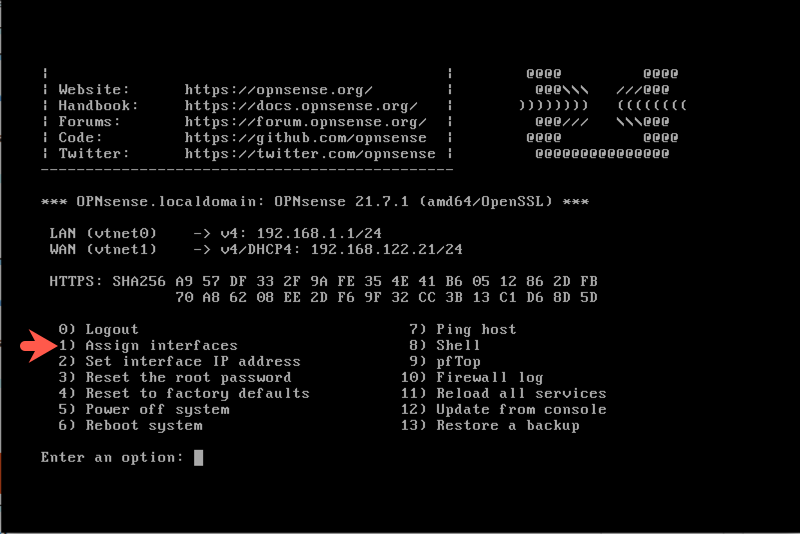
- Do not configure VLANs

- In next screens, assign only LAN interface to vtnet6 network
- Select 1) Assign interfaces
Configure LAN (br_setup) with DHCP
- Select 2) Set interface IP address
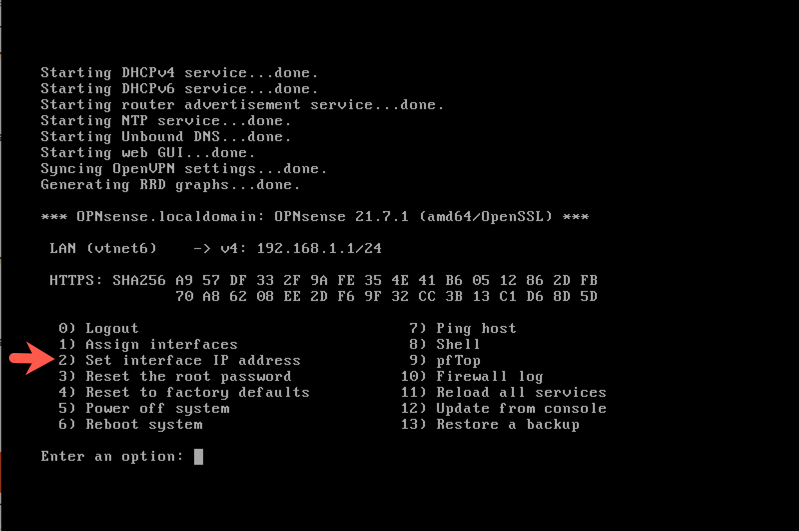
- Configure IPv4 address LAN interface via DHCP
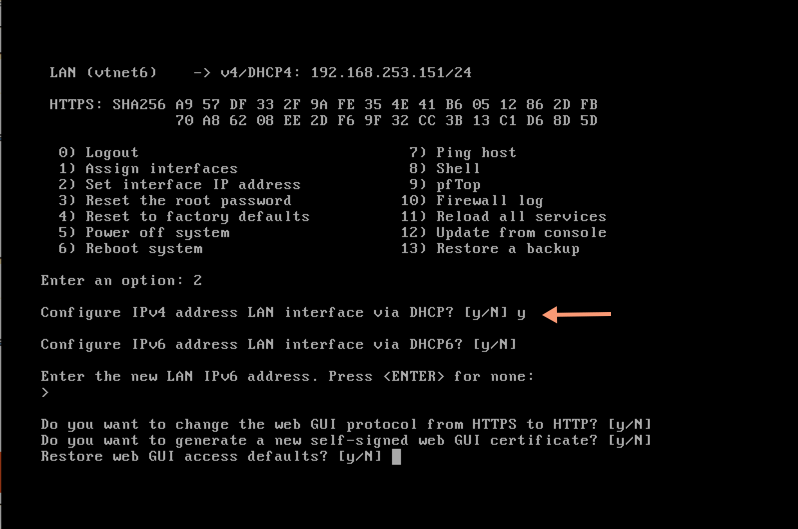
- Reboot the system and check the assigned address for browser access
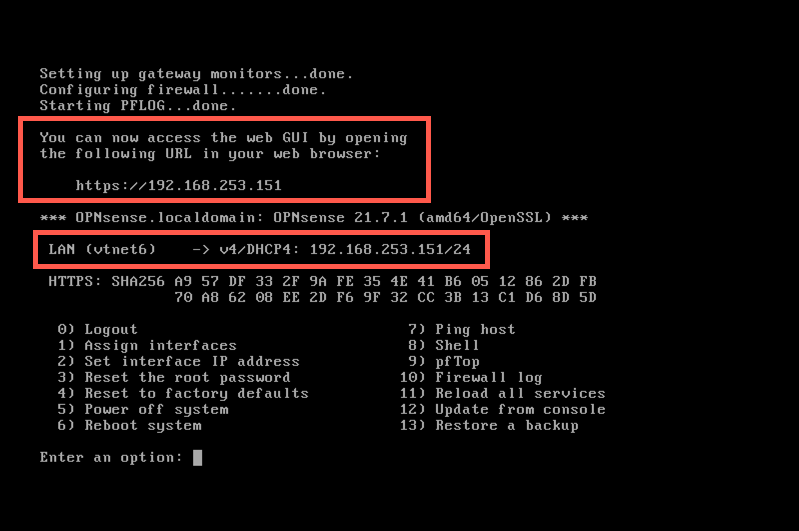
- Select 2) Set interface IP address
Update software to latest version:
- Connect to GUI management interface:
https://<IPAddress> - From the Dashboard click
Click to check for updates - Wait for the package to be proposed and click
Update now - Read the package update messages click
Update now - Accept reboot if required
- Connect to GUI management interface:
Shutdown the machine from kvm host.
virsh shutdown opn-tplvirsh list --all
- Copy template disk for future opnsense installations:
sudo cp -av /srv/vmachines/opn-tpl-sysdisk.qcow2 /srv/setup/
- Delete
opn-tplvirtual machine (keep configuration directory for future use):
sudo cs-kvmserv.sh -m vm-delete -n opn-tpl
Setup OPNSense cluster virtual machines
Cloud-init files
KVM host must have in its setup directory a subdirectory for each virtual machine in the cluster opn-main and opn-aux, with the following configuration files:
cloud_init.yaml: File must exist and must be empty.cloud_netcfg.yaml: File must exist and must be empty.cloud-virt-install.sh: File must exist with the following content:
# This script is designed to be sourced from cs-kvmserv.sh# No shebang intentionally# shellcheck disable=SC2148# Variables not checked intentionally# shellcheck disable=SC2154virt-install --name "${vmachine_name}" \--virt-type kvm --memory 8192 --vcpus 2 \--boot hd,cdrom,menu=on --autostart \--disk path="${vmachines_path}/${vmachine_name}-setup.iso",device=cdrom \--disk path="${vmachines_path}/${vmachine_name}-sysdisk.qcow2",device=disk \--os-variant freebsd12.0 \--network network=br_sys \--network network=br_wan \--network network=br_sys_pfsync \--network network=br_mod_srv \--network network=br_pro_srv \--network network=br_usr \--network network=br_setup \--console pty,target_type=serial \--noautoconsole
Create virtual machines
- To create virtual machines from qcow2 images, open ssh connections in KVM host and execute:
# opn-main on kvm main hostsudo cs-kvmserv.sh -m vm-create -n opn-main -i /srv/setup/opn-tpl-sysdisk.qcow2 -s NONE -p /srv/vm-main# opn-aux on kvm-aux if present, otherwise create on kvm-mainsudo cs-kvmserv.sh -m vm-create -n opn-aux -i /srv/setup/opn-tpl-sysdisk.qcow2 -s NONE -p /srv/vm-auxux
Restore genesis configuration
Full OPNSense configuration is stored in a model called config genesis for both machines in the cluster.
To restore configuration model:
- Find the assigned dhcp ip addresses for
opn-mainandopn-auxmachines and connect to both GUI consoles with https://IPAddress - Login with user
rootand passwordopnsense - Go to System -> Configuration -> Backups
- In
opn-mainmachine restore configuration from fileconfig-opn-main.genesis-xxxxxxxx.xml - In
opn-auxmachine restore configuration from fileconfig-opn-aux.genesis-xxxxxxxx.xml
- In
- Wait for reboot and check reconnect at https://IPAddress:10443
Set secure specific configuration
This step updates initial configuration settings with specific security for your installation.
SECURITY WARNING: This step is mandatory to set a secured environment for your firewall and VPN access.
Prerequisites:
You must prepare the folder secrets in your repository with the specific information for your installation. (Private CA, passwords...)
Set root password
- Connect to
opn-mainandopn-auxmachines GUI consoles with https://IPAddress:10443 - Login with user
rootand passwordNoFear21 - Go to System -> Access -> Users. Edit
rootuser and change password. - Save configuration
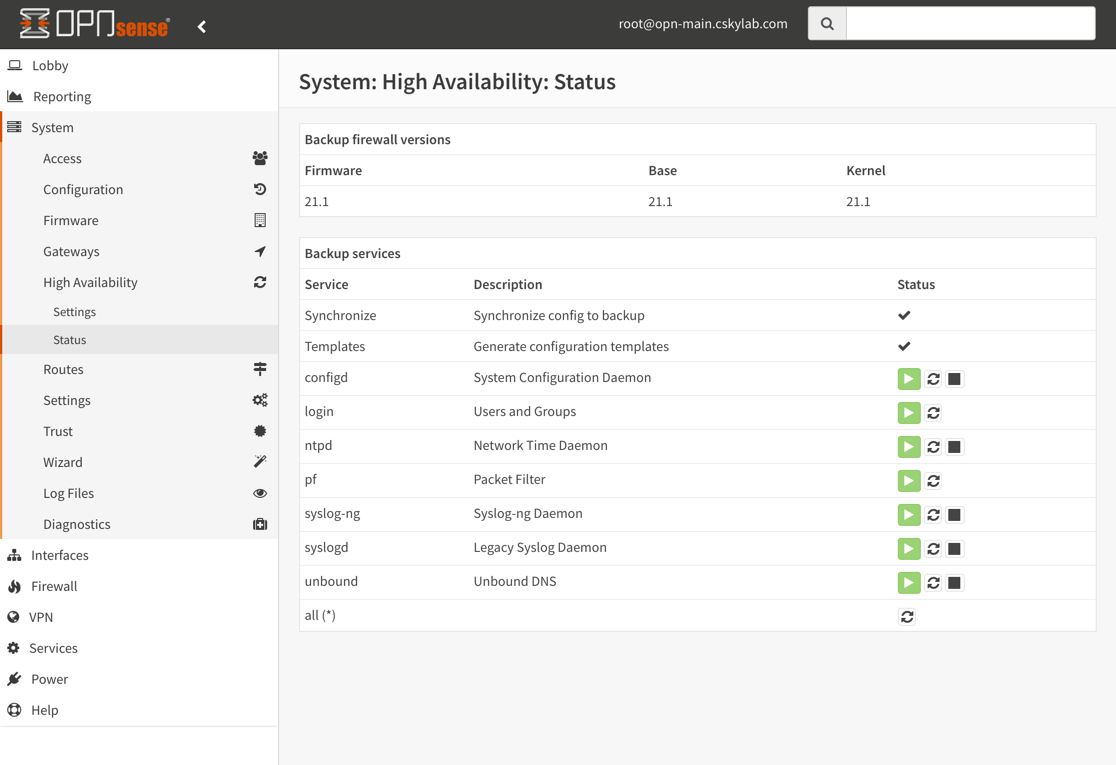
- Go to System -> High Availability -> Status and click button on
Synchronizeservice to synchronize config to backup.
Update synchronization password
- Go to System -> High Availability -> Settings and update
Remote System passwordwith the new password given. - Save configuration
- Go to System -> High Availability -> Status and check synchronization again by clicking button on
Synchronizeservice.
Set General Settings
In both machines opn-main and opn-aux configure general settings:
- Go to System -> Settings -> General
- Set Domain: Your installation name Ex.:
mpb-1100 - Save configuration
Virtual IP Settings
Note: You must have previously created in your internet uplink router the static IP Address for your OPNSense with a port forwarding rule for all protocols.
In opn-main configure virtual IP settings:
- Go to Interfaces -> Virtual IPs -> Settings
- Edit interface
WAN - Set Address to your WAN VIP address
- Set VHID Group to your assigned VHID group
- Apply changes to save configuration
- Go to System -> High Availability -> Status and click button on
Synchronizeservice to synchronize config to backup.
WARNING: Both VIP address and VHID group must be unique among other OPNSense firewalls operating in the same WAN. The virtual MAC address of a CARP interface is
00:00:5e:00:01:XX, where the last two digits will be populated by its vhid.
- Go to Firewall -> Aliases
- Edit alias
WAN_VIP - Set Content to your WAN VIP address
- Apply changes to save configuration
- Go to System -> High Availability -> Status and click button on
Synchronizeservice to synchronize config to backup.
Port Forwarding Settings
In opn-main configure port forwarding settings:
- Go to Firewall -> NAT -> Port Forward
- Edit rule in
Forward SSH to mccinWANinterface - Set Destination port range to your assigned port (Ex. 22-22 or another specific for your installation)
- Save configuration
- Apply changes to save configuration
- Go to System -> High Availability -> Status and click button on
Synchronizeservice to synchronize config to backup.
WAN Rules
In opn-main configure WAN rules settings:
- Go to Firewall -> Rules -> WAN
- Edit rule in
Allow OpenVPN traffic from WAN - Set Destination port range to your assigned port range (Default is 49152-49156 for 5 VLAN's)
- Save configuration
- Apply changes to save configuration
- Go to System -> High Availability -> Status and click button on
Synchronizeservice to synchronize config to backup.
Import private CA
- Go to System -> Trust -> Authorities and add a Certificate Authority
- In Descriptive name set the name of your CA
- In Method select
Import an existing Certificate Authority - Paste Certificate data and Certificate Private Key from your keys
- Save configuration
- Go to System -> High Availability -> Status and click button on
Synchronizeservice to synchronize config to backup.
Generate VPN server certificate
You must create a certificate signed by your private CA
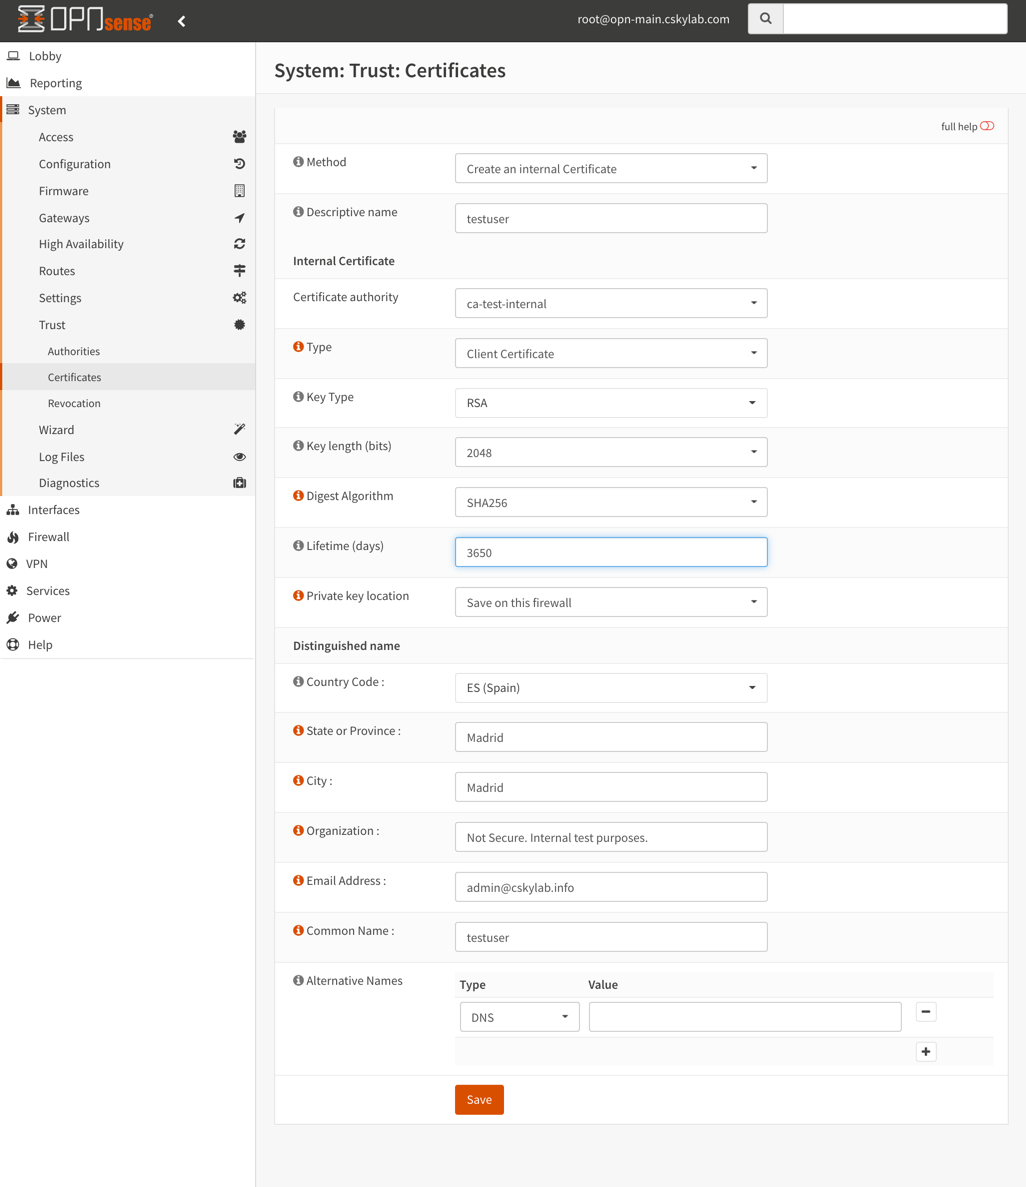
To create and sign a VPN server certificate go to System -> Trust -> Certificates and add a new certificate with the following settings:
- Method:
Create an internal Certificate - Descriptive name:
opn-cluster-VPN - Certificate authority:
Your private CA - Type:
Combined Client/Server Certificate - Key Type:
RSA - Key length (bits):
2048 - Digest Algorithm:
SHA256 - Lifetime (days):
3650 - Private key location:
Save on this firewall - Country Code: Your country code Ex.:
ES (Spain) - State or Province: Your State or Province Ex.:
Madrid - City: Your city Ex.:
Madrid - Organization: Your organization Ex.:
cSkyLab - Email Address: Your email address Ex.:
admin@cskylab.net - Common Name:
opn-cluster-VPN - Alternative names: Create wildcard SAN's for your domain (Or specific FQDN for the registered cluster DNS CNAME or address)
- Type:
DNSValue:opn-cluster-VPN - Type:
DNSValue:*.cskylab.net - Type:
DNSValue:*.cskylab.com(Used in FastStart hosted services)
- Type:
- Save configuration
Generate GUI server certificate (optional)
You can create a certificate signed by your private CA
To create and sign a VPN server certificate go to System -> Trust -> Certificates and add a new certificate with the following settings:
- Method:
Create an internal Certificate - Descriptive name:
opn-cluster-GUI - Certificate authority:
Your private CA - Type:
Server Certificate - Key Type:
RSA - Key length (bits):
2048 - Digest Algorithm:
SHA256 - Lifetime (days):
397 - Private key location:
Save on this firewall - Country Code: Your country code Ex.:
ES (Spain) - State or Province: Your State or Province Ex.:
Madrid - City: Your city Ex.:
Madrid - Organization: Your organization Ex.:
cSkyLab - Email Address: Your email address Ex.:
admin@cskylab.net - Common Name:
opn-cluster-GUI - Alternative names:
- Type:
DNSValue:opn-cluster-GUI - Type:
DNSValue:opn-main.cskylab.net - Type:
DNSValue:opn-aux.cskylab.net
- Type:
- Save configuration
- Go to System -> High Availability -> Status and click button on
Synchronizeservice to synchronize config to backup.
Configure GUI certificate:
- Configure GUI Certificate from System -> Settings -> Administration
- Select SSL Certificate and choose
opn-cluster-GUI - Save configuration
- Select SSL Certificate and choose
- Go to System -> High Availability -> Status and click button on
Synchronizeservice to synchronize config to backup.
OpenVPN Servers
Initial configuration comes with two preconfigured VPN servers:
mpb-genesis-mgtfor management accessmpb-genesis-usrfor general user access
To modify and secure VPN servers, connect to opn-main and configure the following settings:
Go to VPN -> OpenVPN -> SERVERS
Edit
mpb-genesis-mgtserver:- Set Description to Your installation name-mgt Ex.:
mpb-1100-mgt - Set Local Port to your assigned port for management vpn Ex.:
49152 - Set TLS Authentication to
Disabledto delete existing TLS Shared Key - Set Peer Certificate Authority to
Your private CA - Set Server Certificate to
opn-cluster-VPN - Save configuration
- Edit the configuration again and set TLS Authentication to
Enabled - Authentication only - Leave checked Automatically generate a shared TLS authentication key to generate a new TLS Shared Key.
- Save configuration
- Set Description to Your installation name-mgt Ex.:
Edit
mpb-genesis-usrserver:- Set Description to Your installation name-mgt Ex.:
mpb-1100-usr - Set Local Port to your assigned port for management vpn Ex.:
49153 - Set TLS Authentication to
Disabledto delete existing TLS Shared Key - Set Peer Certificate Authority to
Your private CA - Set Server Certificate to
opn-cluster-VPN - Save configuration
- Edit the configuration again and set TLS Authentication to
Enabled - Authentication only - Leave checked Automatically generate a shared TLS authentication key to generate a new TLS Shared Key.
- Save configuration
- Set Description to Your installation name-mgt Ex.:
Go to System -> High Availability -> Status and click button on
Synchronizeservice to synchronize config to backup.
OpenVPN Users and certificates
Initial configuration comes with two preconfigured VPN users:
vpnmgt: Access to "management VPN"vpnusr: Access to "users VPN"
You can use directly these two generic users, or you can add personal users (and their specific access configuration files) if you want.
Set passwords for users
vpnmgtandvpnusr(Repeate these steps for each one):- Go to System -> Access -> Users
- Edit user
- Set Password and confirmation to your desired new password
- Save user configuration
- Go to System -> Access -> Tester
- Test Username and Password
Set User Certificate for users
vpnmgtandvpnusr(Repeate these steps for each one):- Go to System -> Access -> Users
- Edit user
- Delete previous User Certificate
- Add User Certificate with the following values (Leave the other values by default):
- Method:
Create an internal Certificate - Certificate authority:
Your private CA - Lifetime (days):
3650 - Private key location:
Save on this firewall - Country Code: Your country code Ex.:
ES (Spain) - State or Province: Your State or Province Ex.:
Madrid - City: Your city Ex.:
Madrid - Organization: Your organization Ex.:
cSkyLab - Email Address: Your email address Ex.:
admin@cskylab.net - Save certificate configuration
- Method:
- Save user configuration
Go to System -> High Availability -> Status and click button on
Synchronizeservice to synchronize config to backup.
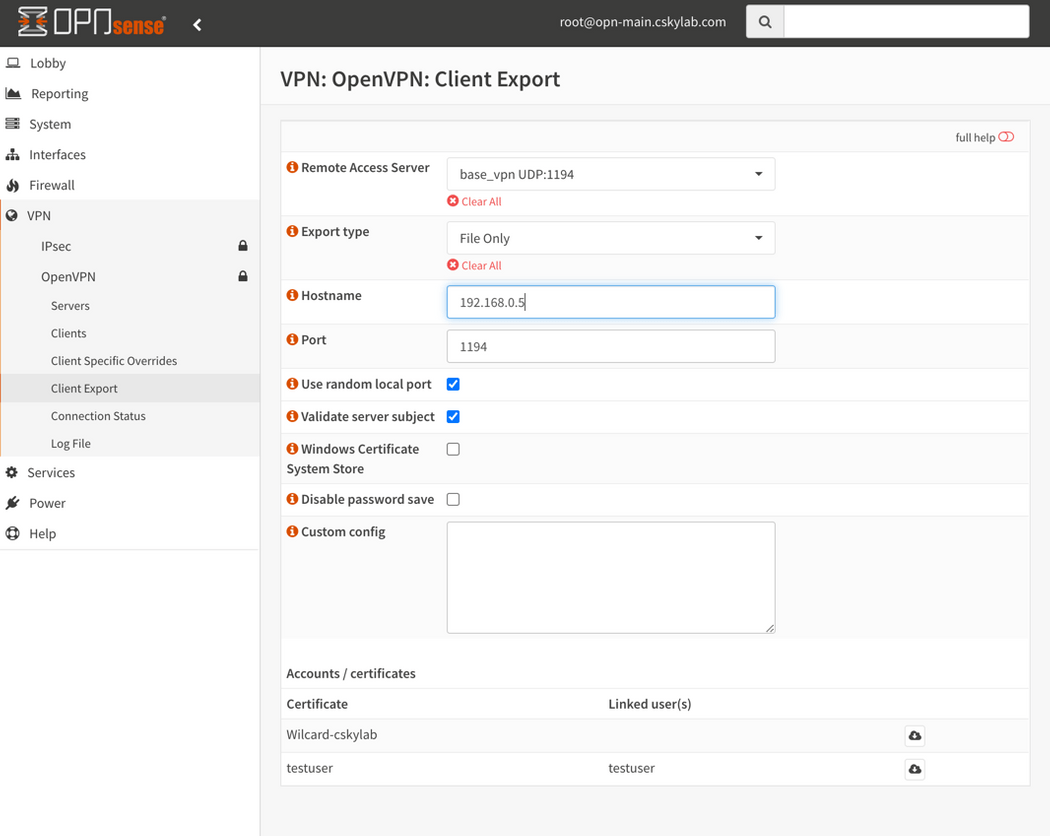
Export OpenVPN client profiles
You must export a profile for each user and server combination. Repeat the following steps for mgt and usr servers:
- Go to VPN -> OpenVPN -> Client Export
- In Remote Access Server Select your server (
mgtorusr) - Set Export type Choose
File Onlyfor OpenVPN Connect client orViscosity (visz)for Viscosity client. - Change Hostname to FQDN registered DNS CNAME or address (Ex.: Duck DNS registered name)
- Change Port to the apropriate server port (Ex.:
49152) - Check Use random local port
- Check Validate server subject
- Click the download button for the user profile to download.
- Save the downloaded profiles into your
opn-clusterconfiguration folder in your installation repository.
Note: You can send the downloaded profile file as an attachment, in an email message to the user. The user must import the profile with the client application (OpenVPN Connect or Viscosity) and test the connection from mobile and desktop environments.
Remove example certificates and ca-test-internal
- Go to System -> Trust -> Certificates and delete the following unused certificates:
| Certificate | Issuer |
|---|---|
| vpnmgt | ca-test-internal |
| vpnusr | ca-test-internal |
| OpenVPN | ca-test-internal |
- Go to System -> Trust -> Authorities and delete
ca-test-internalnot secure CA. - Go to System -> High Availability -> Status and click button on
Synchronizeservice to synchronize config to backup.
Backup configurations and reboot
- Go to System -> High Availability -> Status and click button on
Synchronizeservice to synchronize config to backup. - Go to System -> Configuration -> Backups and backup configurations of both
opn-mainandopn-aux - Save the downloaded backup xml files into your
opn-clusterconfiguration folder in your installation repository. - Go to Power -> Reboot and reboot both
opn-mainandopn-aux
Test VPN's with vpnmgt and vpnusr profiles
- Import profiles to
OpenVPN Connectclient in your computer - Test connection to both VPN's
Usage procedures
Backup and restore configuration
You can find complete information about backup alternatives in https://docs.opnsense.org/manual/backups.html#backup
To backup or restore configuration:
Go to System -> Configuration -> Backups
Click
Download configurationto download configuration in XML format.Click
Choose file&Restore configurationto restore configuration from XML file.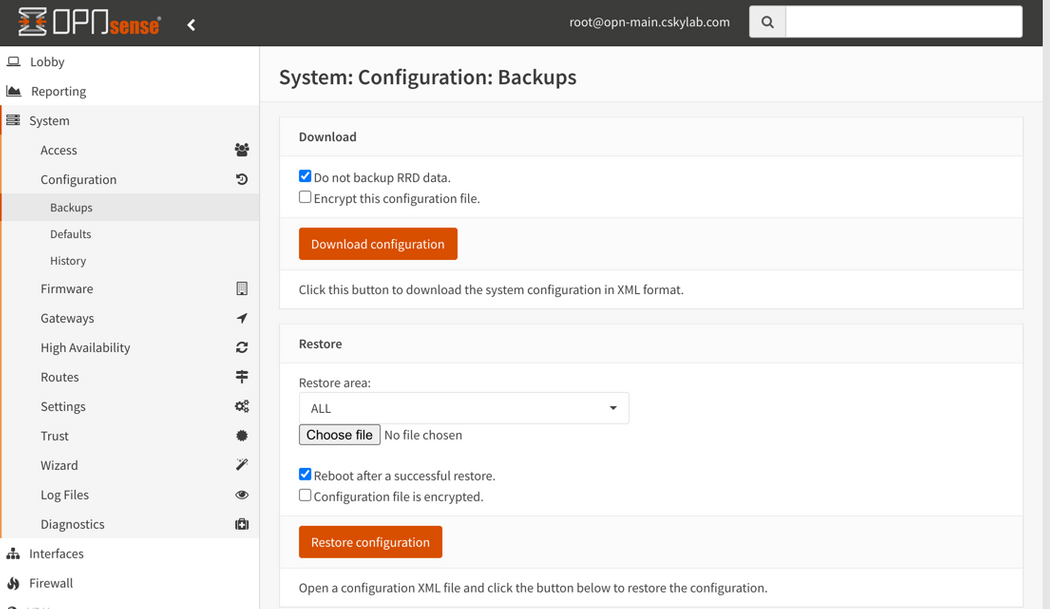

Update cluster
Updates should be performed on slave firewall, and once stable, perform the update of master firewall
For more information about updates see https://docs.opnsense.org/manual/updates.html
To perform updates on opn-aux:
- Go to System -> Firmware -> Updates and click
Check for updates - Wait for the package to be proposed and click
Update now - Read the package update messages click
Update now - Accept reboot if required
Once opn-aux is updated and running, perform the same update procedure on opn-main.
Services configuration procedures
CA's & Certificate management
Follow these procedures to create a private CA and issue private certificates. (For more information see https://docs.opnsense.org/manual/how-tos/self-signed-chain.html)
Create or import the Root CA
The following procedure is an example with a provided internal test CA ca-test-internal
NOTE: You should prepare your own private CA for internal purposes. It is recommended to delete the
ca-test-internalbecause its private key is not confidential, and therefore it is not secure. You shoud create a new one, with your own data and preserve the security of its private key.
To create a root CA go to System -> Trust -> Authorities and add a new CA with the following settings:
- Descriptive name:
ca-test-internal - Method:
Create an internal Certificate Authority - Key Type:
RSA - Key length (bits):
2048 - Digest Algorithm:
SHA256 - Lifetime (days):
7300 - Country Code:
ES (Spain) - State or Province:
Madrid - City:
Madrid - Organization:
Not secure. Internal test purposes - Email Address:
admin@cskylab.net - Common Name:
ca-test-internal Save- Export and save CA cert file:
Export CA cert button - Export and save CA private Key file:
Export CA private Key button
To import a root CA go to System -> Trust -> Authorities and add a new CA with the following settings:
- Descriptive name:
ca-test-internal - Method:
Import an existing Certificate Authority - Certificate data: Paste the content of
.crtcertificate file - Certificate Private Key: Paste the content of
.keyprivate key file - Serial for next certificate: Leave blank
Create and sign certificates
To create and sign a certificate go to System -> Trust -> Certificates and add a new certificate with the following settings (example):
- Method:
Create an internal Certificate - Descriptive name:
Wilcard-cskylab - Certificate authority:
ca-test-internal - Type:
Combined Client/Server Certificate - Key Type:
RSA - Key length (bits):
2048 - Digest Algorithm:
SHA256 - Lifetime (days):
397 - Private key location:
Save on this firewall - Country Code:
ES (Spain) - State or Province:
Madrid - City:
Madrid - Organization:
Not secure. Internal test purposes - Email Address:
admin@cskylab.net - Common Name:
Wilcard-cskylab - Alternative names:
- Type:
DNS - Value:
*.cskylab.net
- Type:
Save
Export certificate .crt file, private key .key file, or combined ca+cert+key .p12 file as needed.
Assign GUI certificate
NOTE: You should prepare your own GUI certificate from your private and secure CA for internal purposes. It is recommended to delete the
Wilcard-cskylabcertificate provided only as an example, because its private key is not confidential, and therefore it is not secure. You shoud create a new one, with your own data and preserve the security of its private key.
Configure GUI Certificate from System -> Settings -> Administration
- Select SSL Certificate and choose
Wilcard-cskylab - Select Listen interfaces and choose
All (recommended)
- Select SSL Certificate and choose
After configuration, go to System -> High Availability -> Status and click button
Synchronizeto synchronize config to backup.
Dynamic DNS
This procedure covers opnsense configuration with Duck DNS dynamic DNS provider. To learn more about opnsense dynamic DNS configuration with other providers see https://docs.opnsense.org/manual/dynamic_dns.html#setting-up-a-dynamic-ip-address
Register a hostname in Duck DNS
Login with an external account of any of the supported types to https://www.duckdns.org/
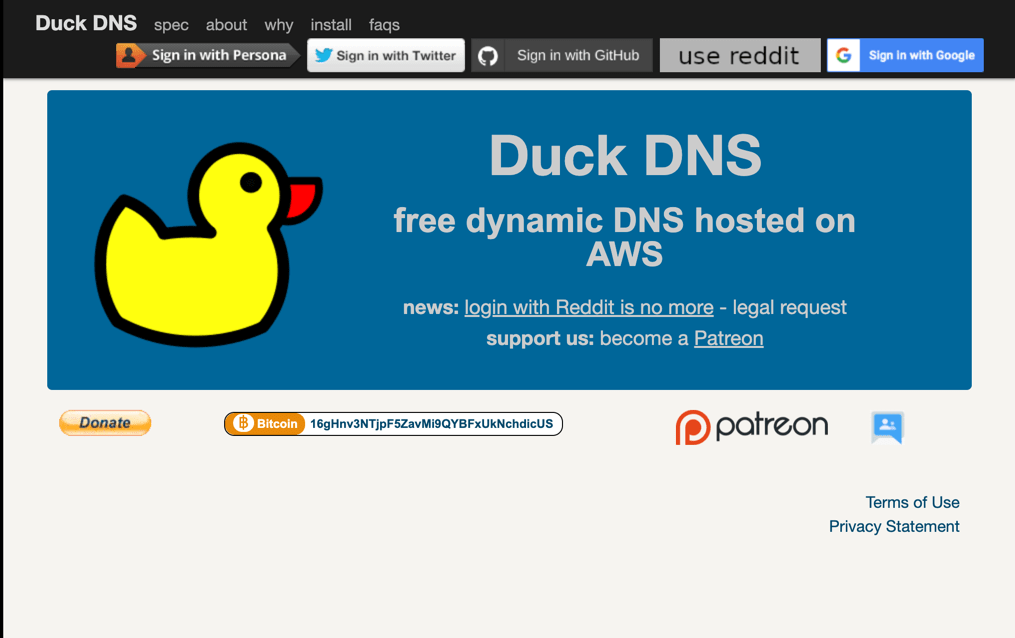
Choose a unique name not registered before. Ex
cskylab1234. This will register a hostnamecskylab1234.duckdns.org.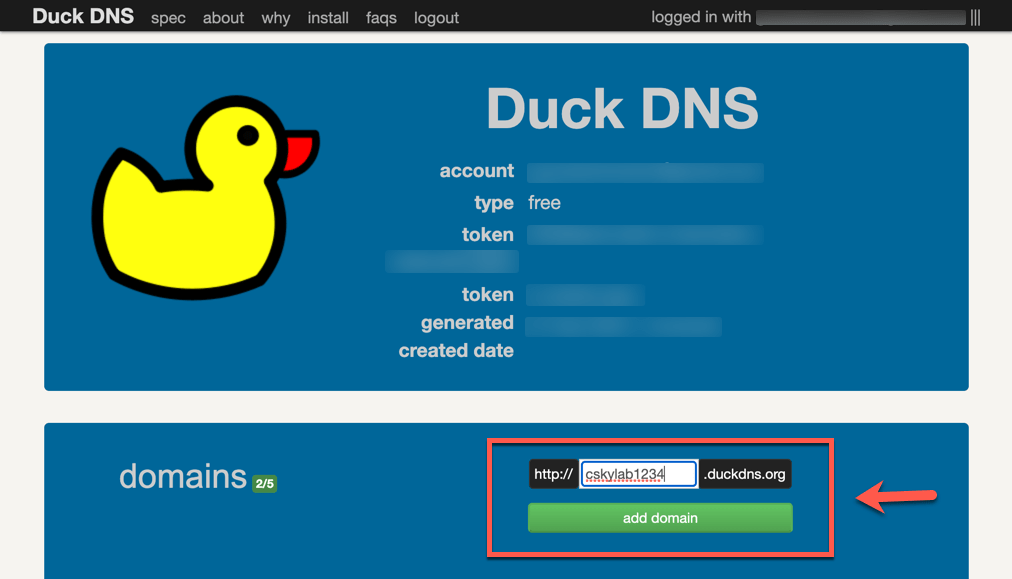
Update current IP address manually to a fake value, to check afterwards how dynamic IP is registered. Ex
8.8.8.8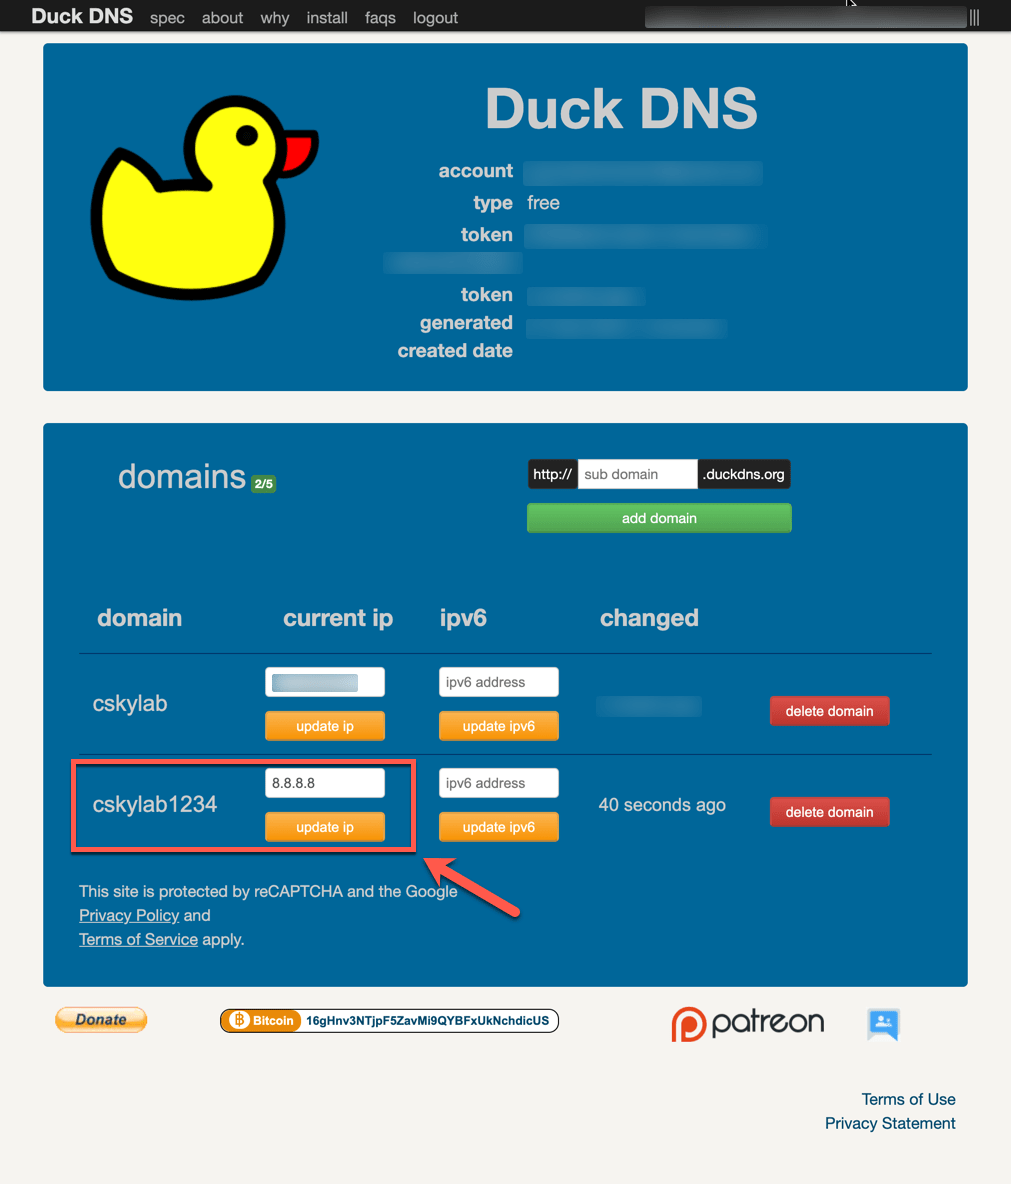
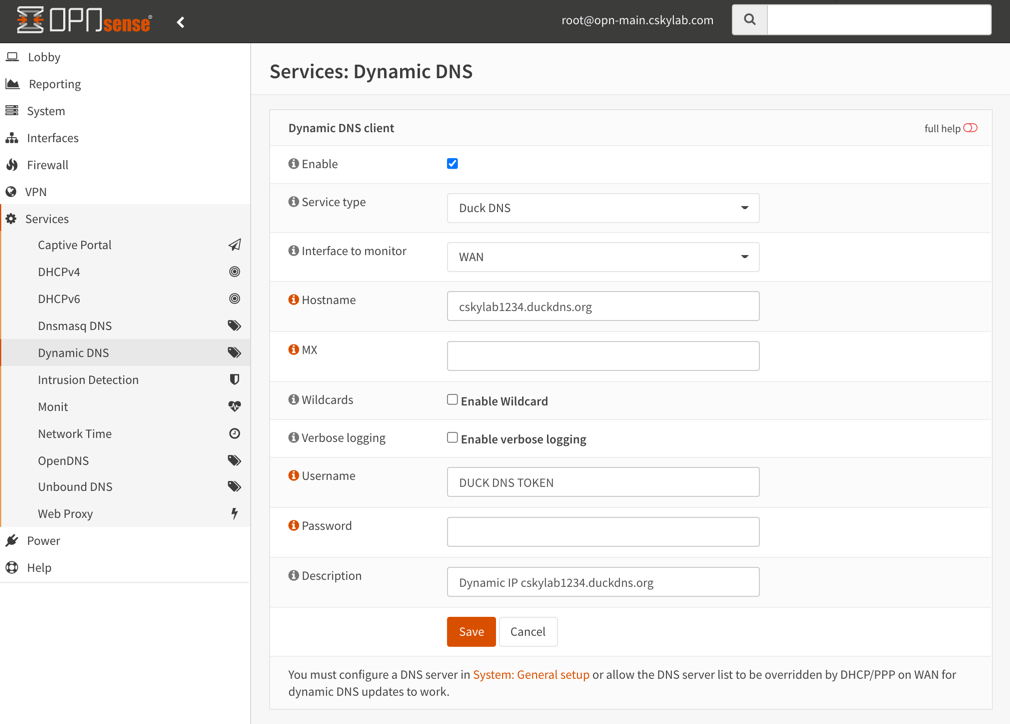
Configure master firewall
On
opn-mainmaster firewall go to Services -> Dynamic DNS and perform the following configuration:NOTE: Enter your Duck DNS token in Username field and leave Password empty
After configuration, go to System -> High Availability -> Status and click button
Synchronizeto synchronize config to backup.
Check dynamic DNS registration
On
opn-mainmaster firewall go to Services -> Dynamic DNS. Edit the service to save and force an update. Check the cached IP address.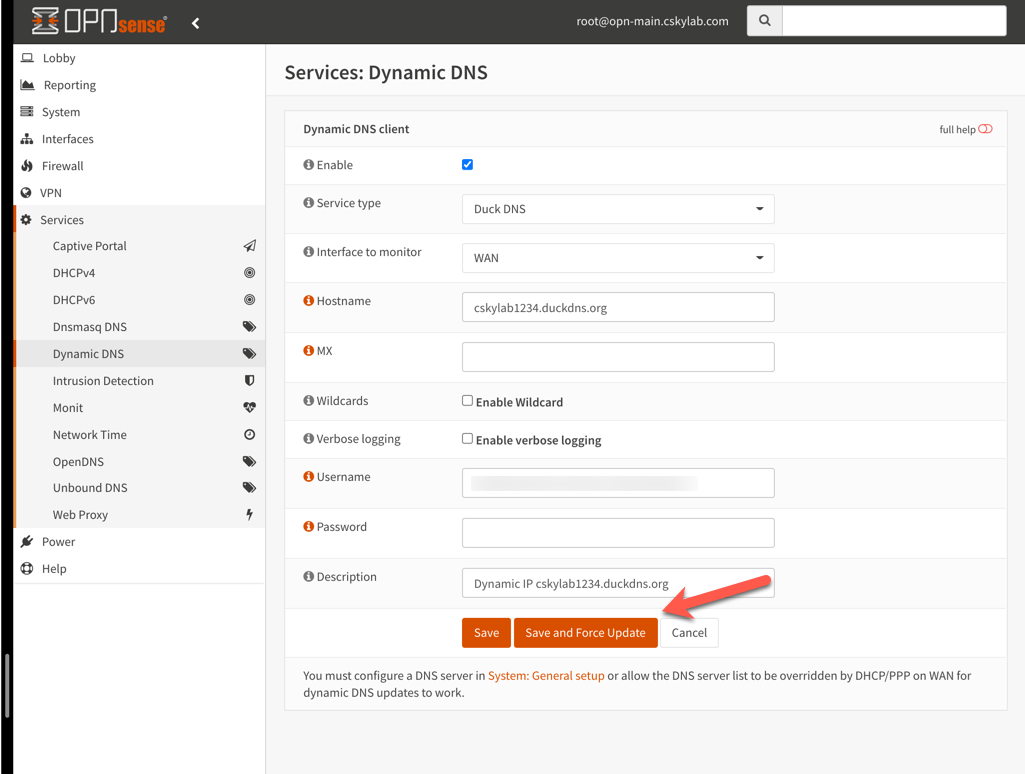
Login to https://www.duckdns.org/ and check how the IP address has been updated:

Publish dynamic DNS registration in your own domain
To publish services in your own domain, you must point a CNAME record to the registered Duck DNS host.
Example: If you want to publish gitlab.mydomain.com, you should add the following record in mydomain.com zone
gitlab IN CNAME cskylab1234.duckdns.org.
HA Cluster configuration
Note: This service is configured in
opn.genesisconfiguration according to the described procedures. You can use them to change the default configuration if needed.
One of the most powerful features of OPNsense is to set-up a redundant firewall with automatic fail-over option. This procedure describes how to create a cluster with opn-main and opn-aux virtual machines.
For a more complete guide on HA configuration see:
PFSYNC Firewall rules
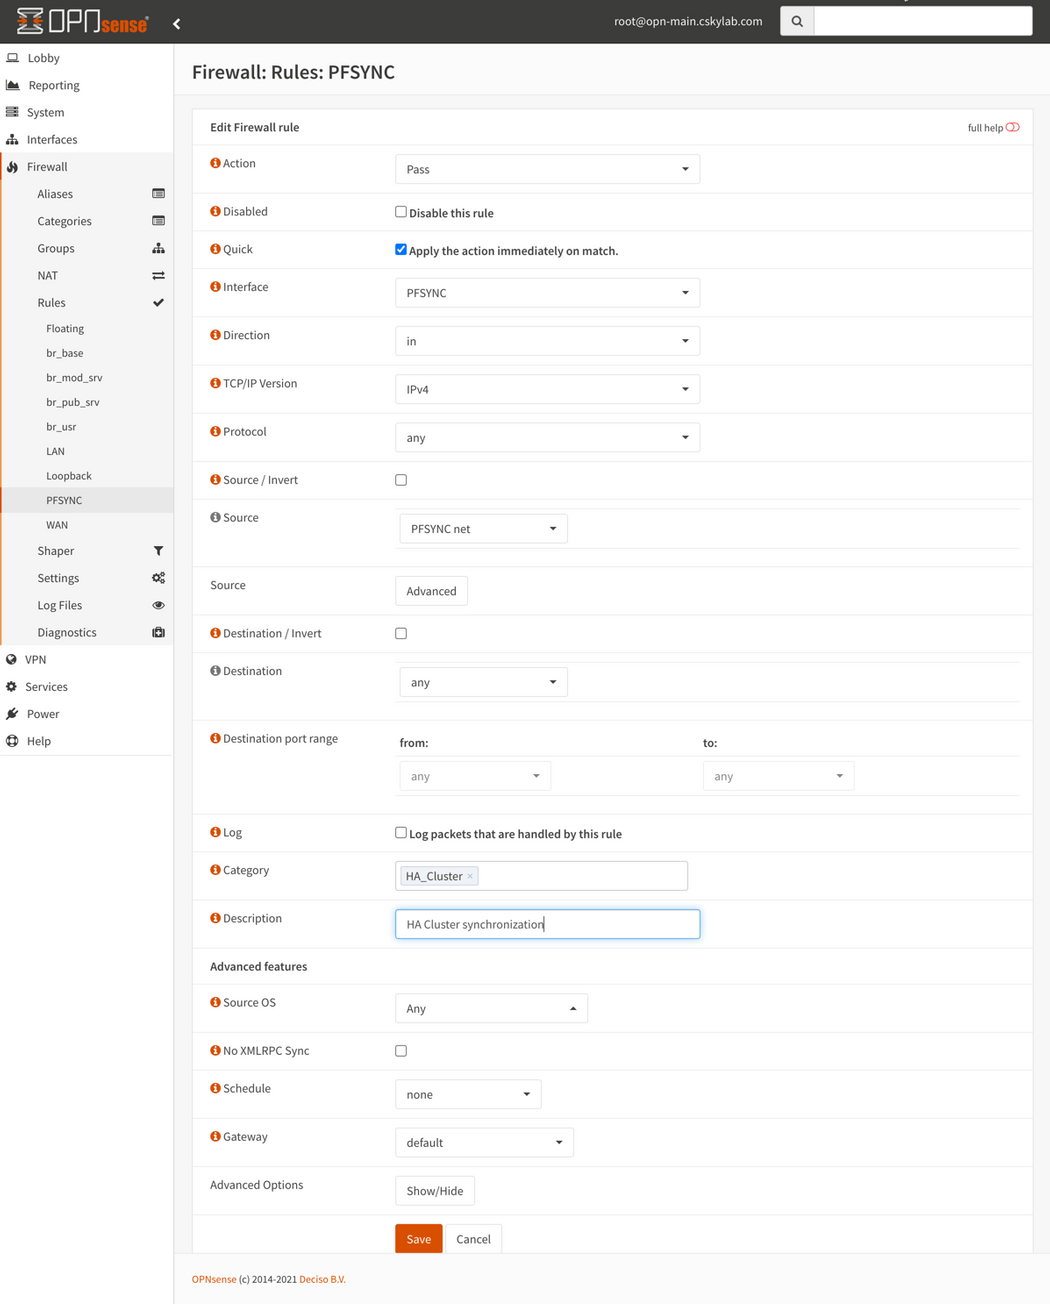
Create firewall allow rules for PFSYNC on both machines.
- Go to Firewall -> Rules -> PFSYNC
- Add allow rule: Since it is a direct cable connection, set it to allow any network traffic. (Category: HA_Cluster)
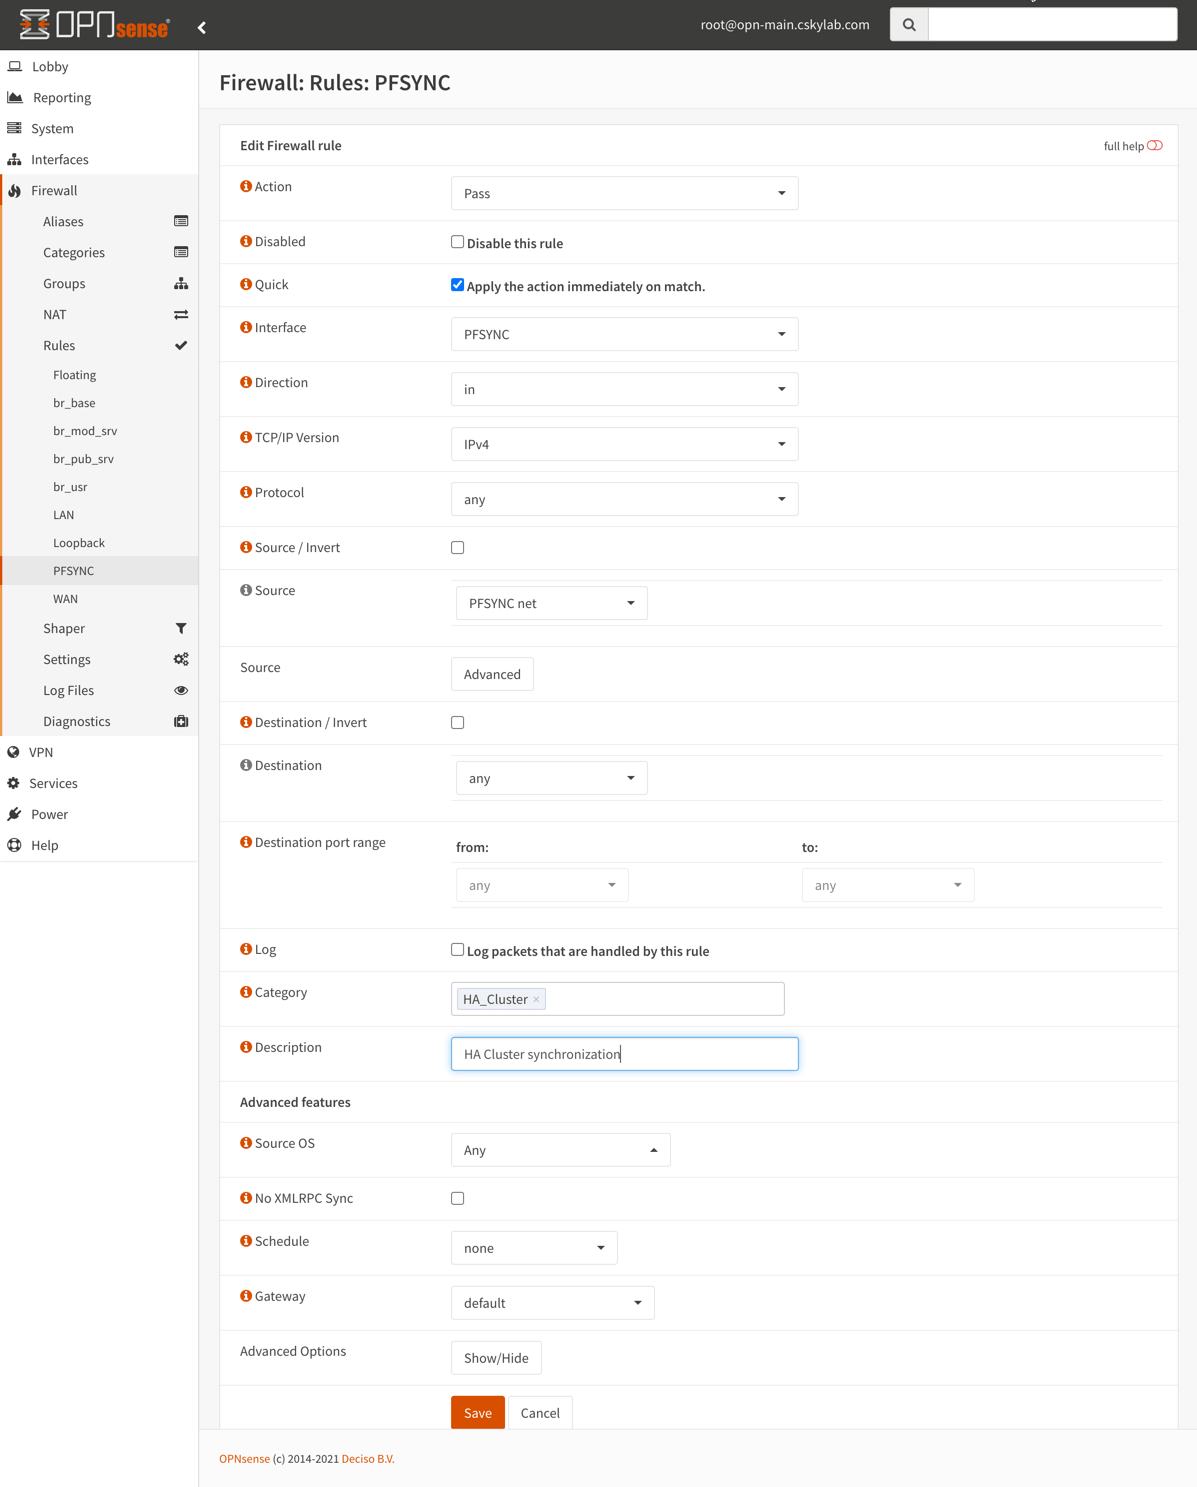
Master Firewall (opn-main): Set pfSync and HA synchronization (xmlrpc)
HA Settings: Go to System -> High Availability -> Settings and configure the following settings:
Synchronize States: Checked ✔
Disable preempt: Unchecked. WARNING: Do NOT check this option on Master Firewall
Synchronize Interface: PFSYNC
Synchronize Peer IP: 192.168.81.242 (Use here the IP address of PFSYNC interface of
opn-aux)Synchronize Config to IP: 192.168.81.242 (Use here the IP address of PFSYNC interface of
opn-aux)Remote System Username: root
Remote System Password: (password on
opn-aux)Select all services to be synchronized
Restart firewall after saving

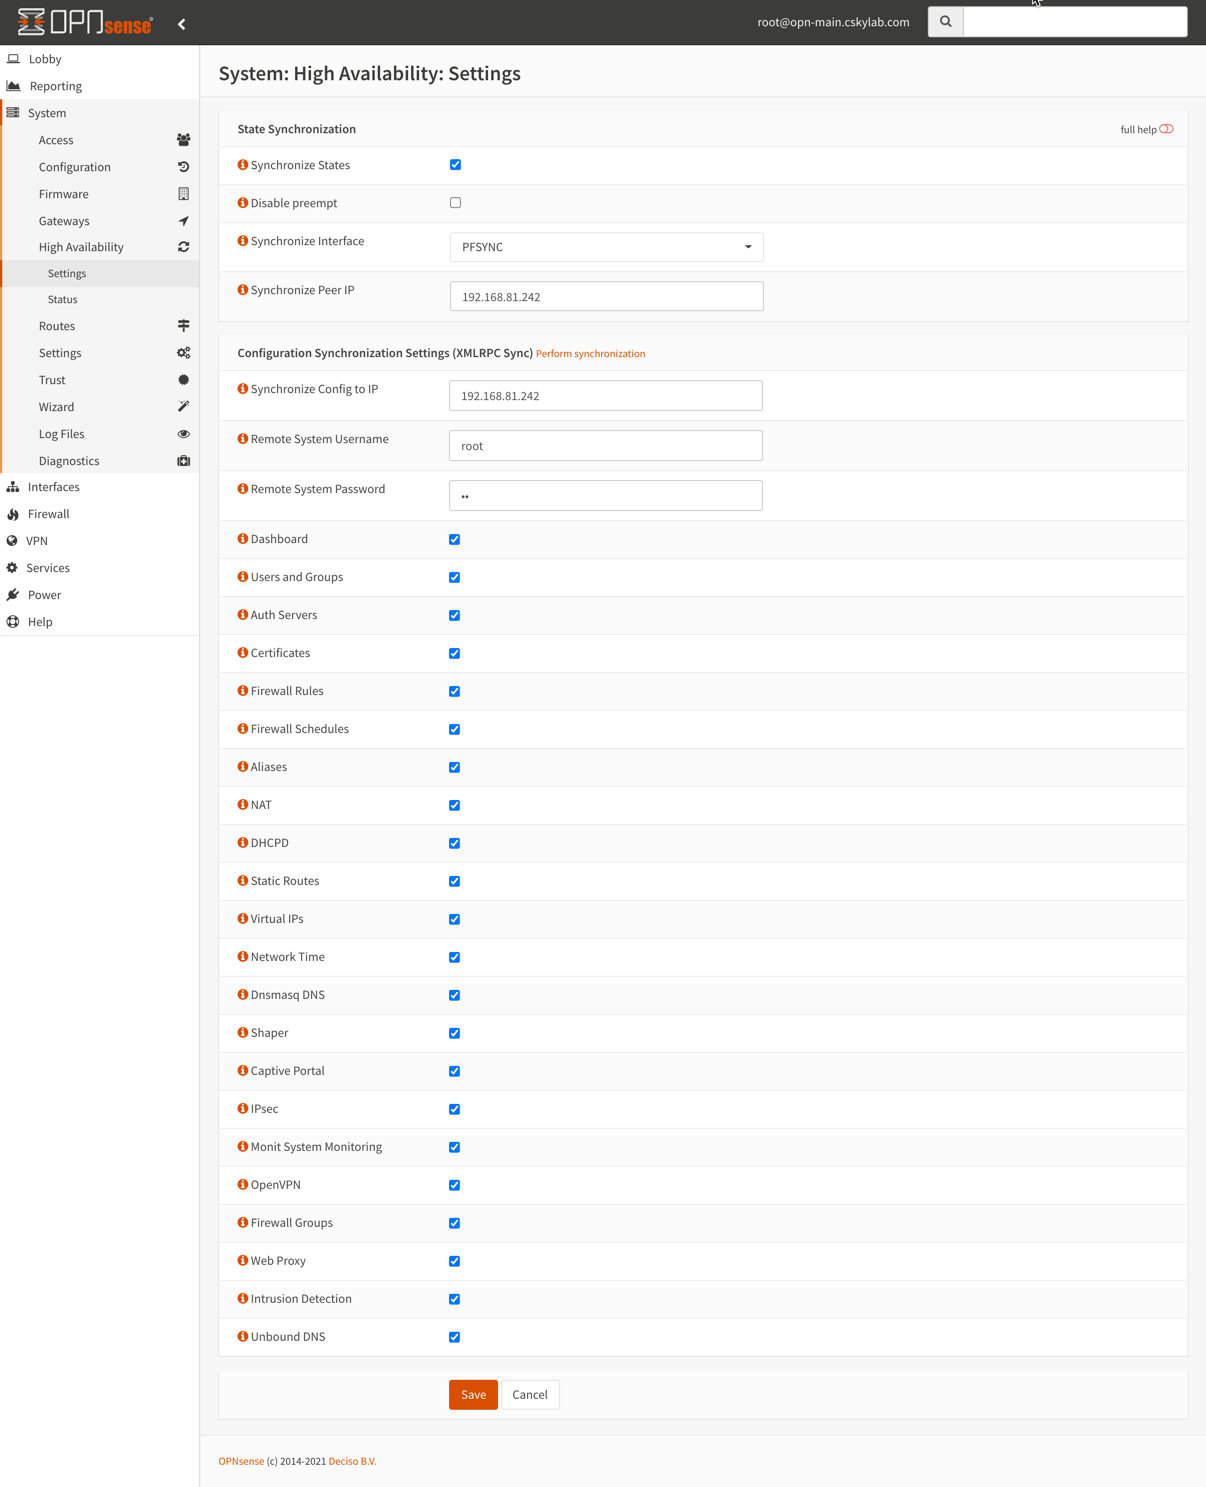
Slave Firewall (opn-aux): Set pfSync
HA Settings: Go to System -> High Availability -> Settings and configure the following settings:
Synchronize States: Checked ✔
Disable preempt: Checked ✔. WARNING: Always check this option on Slave Firewall
Synchronize Interface: PFSYNC
Synchronize Peer IP: 192.168.81.241 (Use here the IP address of PFSYNC interface of
opn-main)Synchronize Config to IP: Leave empty (Slave does not perform any synchronization)
Remote System Username: root
Remote System Password: (password on
opn-main)Restart firewall after saving

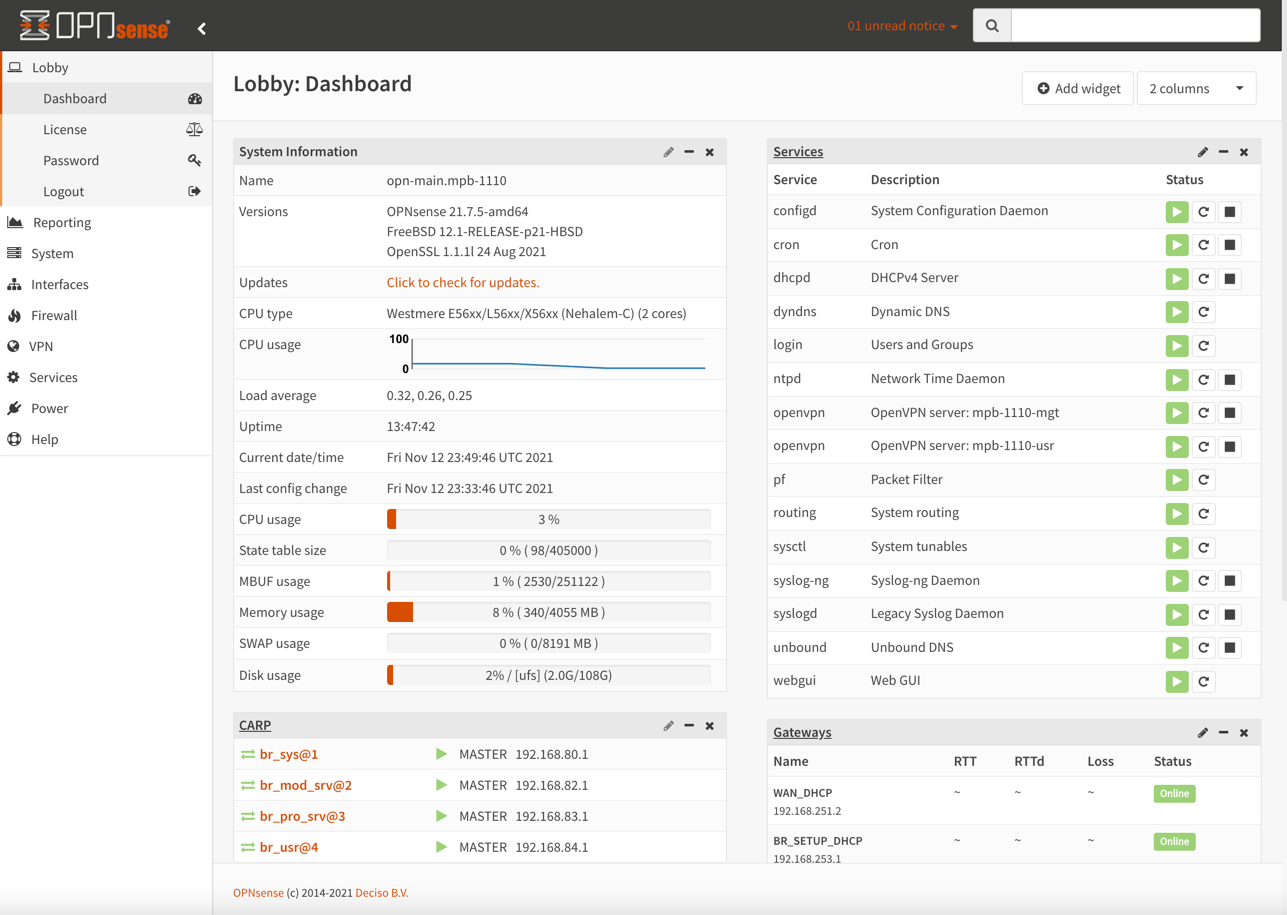
Configure Dashboard
On Master Firewall (opn-main) goto Lobby -> Dashboard
- Add the CARP widget by clicking on + Add Widget, select CARP and then clicking on
Save Settings.
Synchronize settings
To test synchronization between master and slave:
Connect to master (
opn-main)Go to System -> High Availability -> Status
Push button to synchronize config to backup
Verify Ok Status

Intrusion Prevention System (Optional)
This deep packet inspection system is very powerful and can be used to mitigate security threats at wire speed.
For additional information see: https://docs.opnsense.org/manual/ips.html
To perform a basic configuration of Intrusion Prevention System:
Download Rulesets: Go to Services -> Intrusion Detection -> Administration -> Download. Select all rulesets, click
Enable selectedandDownload & Update Rules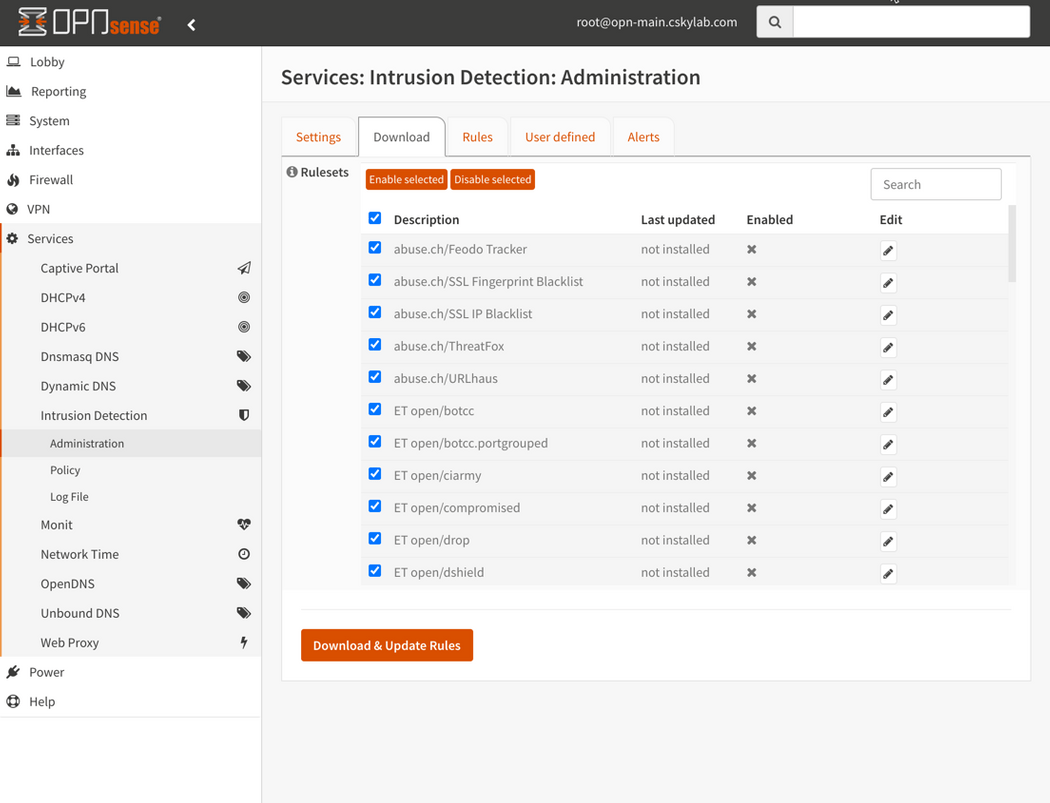
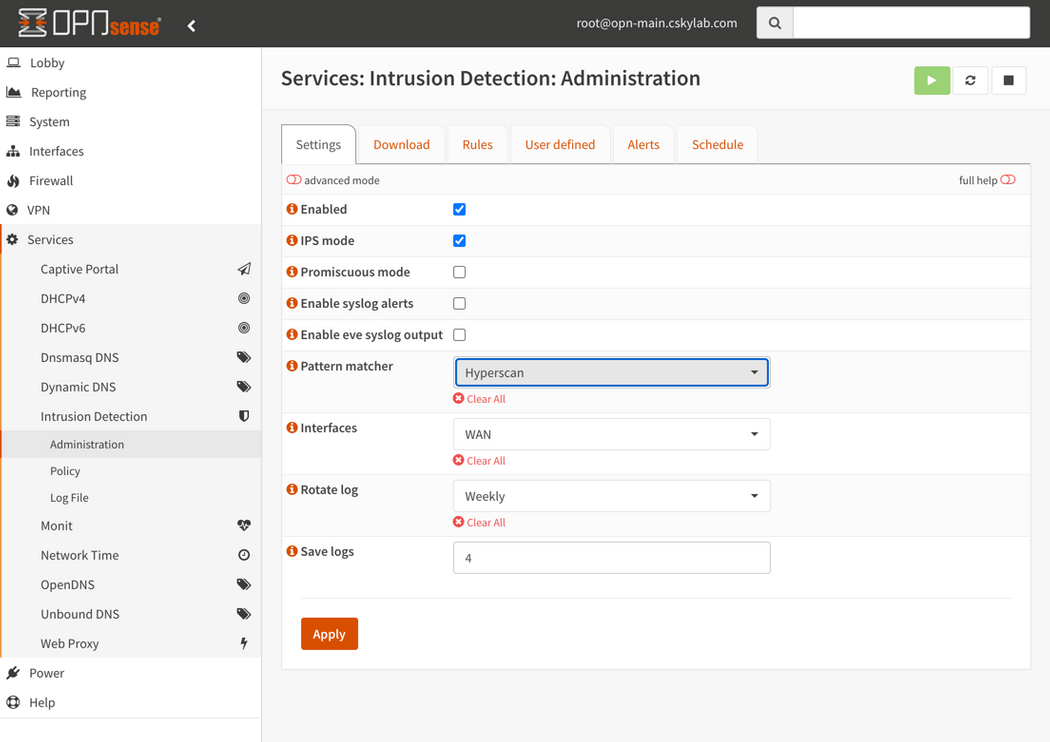
General Settings: Go to Services -> Intrusion Detection -> Administration -> Settings and enable service and IPS mode. (You can enable or disable all service as required from this window)
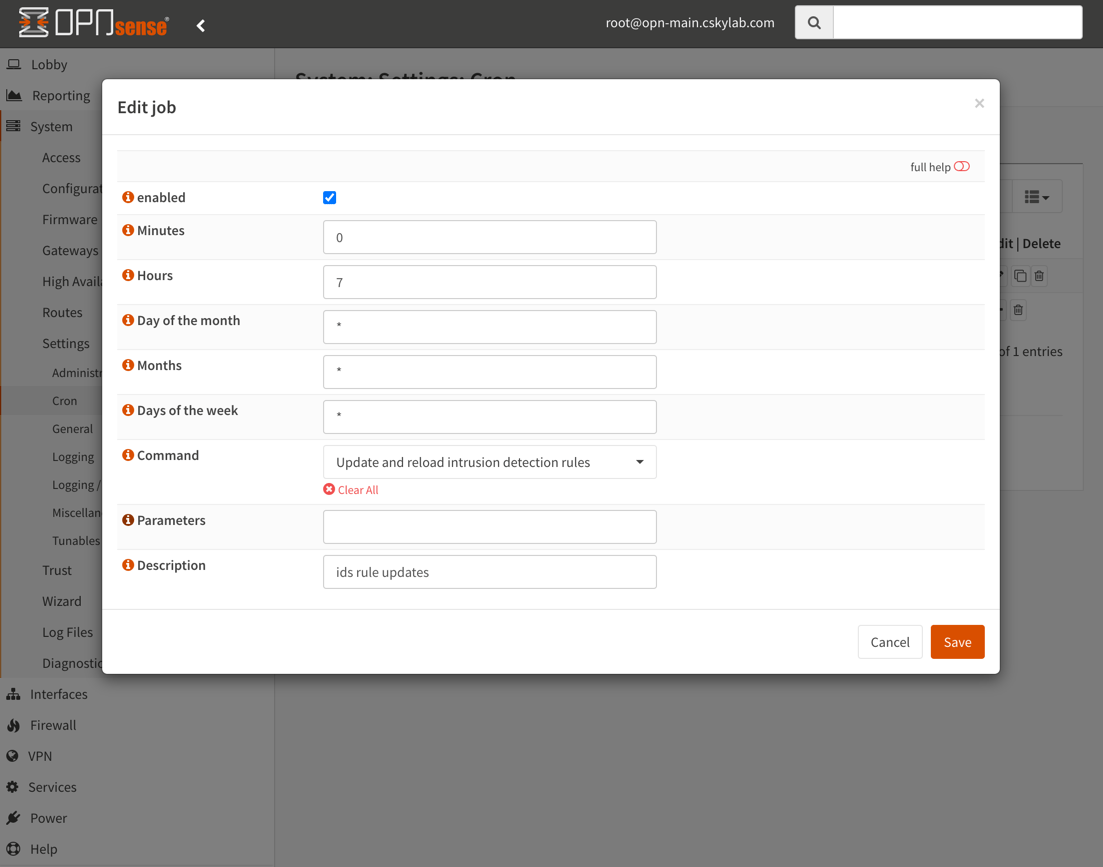
Schedule: Go to Services -> Intrusion Detection -> Administration -> Schedule and set the following configuration to update intrusion detection rules every day at 7:00 am.

Policy: If required, you chan change the
Alertdefault policy toDropfor any or all of the rulesets. To do so, go to Services -> Intrusion Detection -> Policy, select the rulesets and set the appropriate policy.After configuration, go to System -> High Availability -> Status and click button
Synchronizeto synchronize config to backup.

OpenVPN Service
OPNsense supports VPN connections for branch offices as well as remote users. This section covers procedures for both types of connections using OpenVPN (SSL VPN). For more information about OPNsense VPN options see:
- https://homenetworkguy.com/how-to/configure-openvpn-opnsense/
- https://www.sparklabs.com/support/kb/article/setting-up-an-openvpn-server-with-opnsense-and-viscosity/
- https://docs.opnsense.org/manual/vpnet.html#
Prerequisites:
- Assign a static IP in your uplink router: In your uplink router, you must assign a static IP for your opnsense router. (Select an address out of the scope of DHCP).
- Create a full forward rule in your uplink router: In your uplink router, you must create a full forward rule to the static IP address previously assigned for your opnsense router.
- Create a VIP in your opnsense: In your opnsense, you must create a VIP address in your WAN interface, with the static IP address previously assigned in the full forward rule at your uplink router. For creating a VIP address see Set up virtual IPs section on this document.
- Create a Certificate Authority (CA): You must have previously created your own private and secure CA. For creating your own CA see Create or import the Root CA section on this document.
- Create a Certificate for OpenVPN Server: You must create a secure private certificate for OpenVPN. For creating a private certificate see Create and sign certificates section on this document.
OpenVPN Server Wizard
Launch the VPN Wizard: Go to VPN -> OpenVPN -> Servers and click
Use a wizard to setup a new serverSelect an Authentication Backend Type:
Local User Access.Choose a Certificate Authority (CA): Select your private and secured CA
Choose a Server Certificate: Select your private and secured certificate
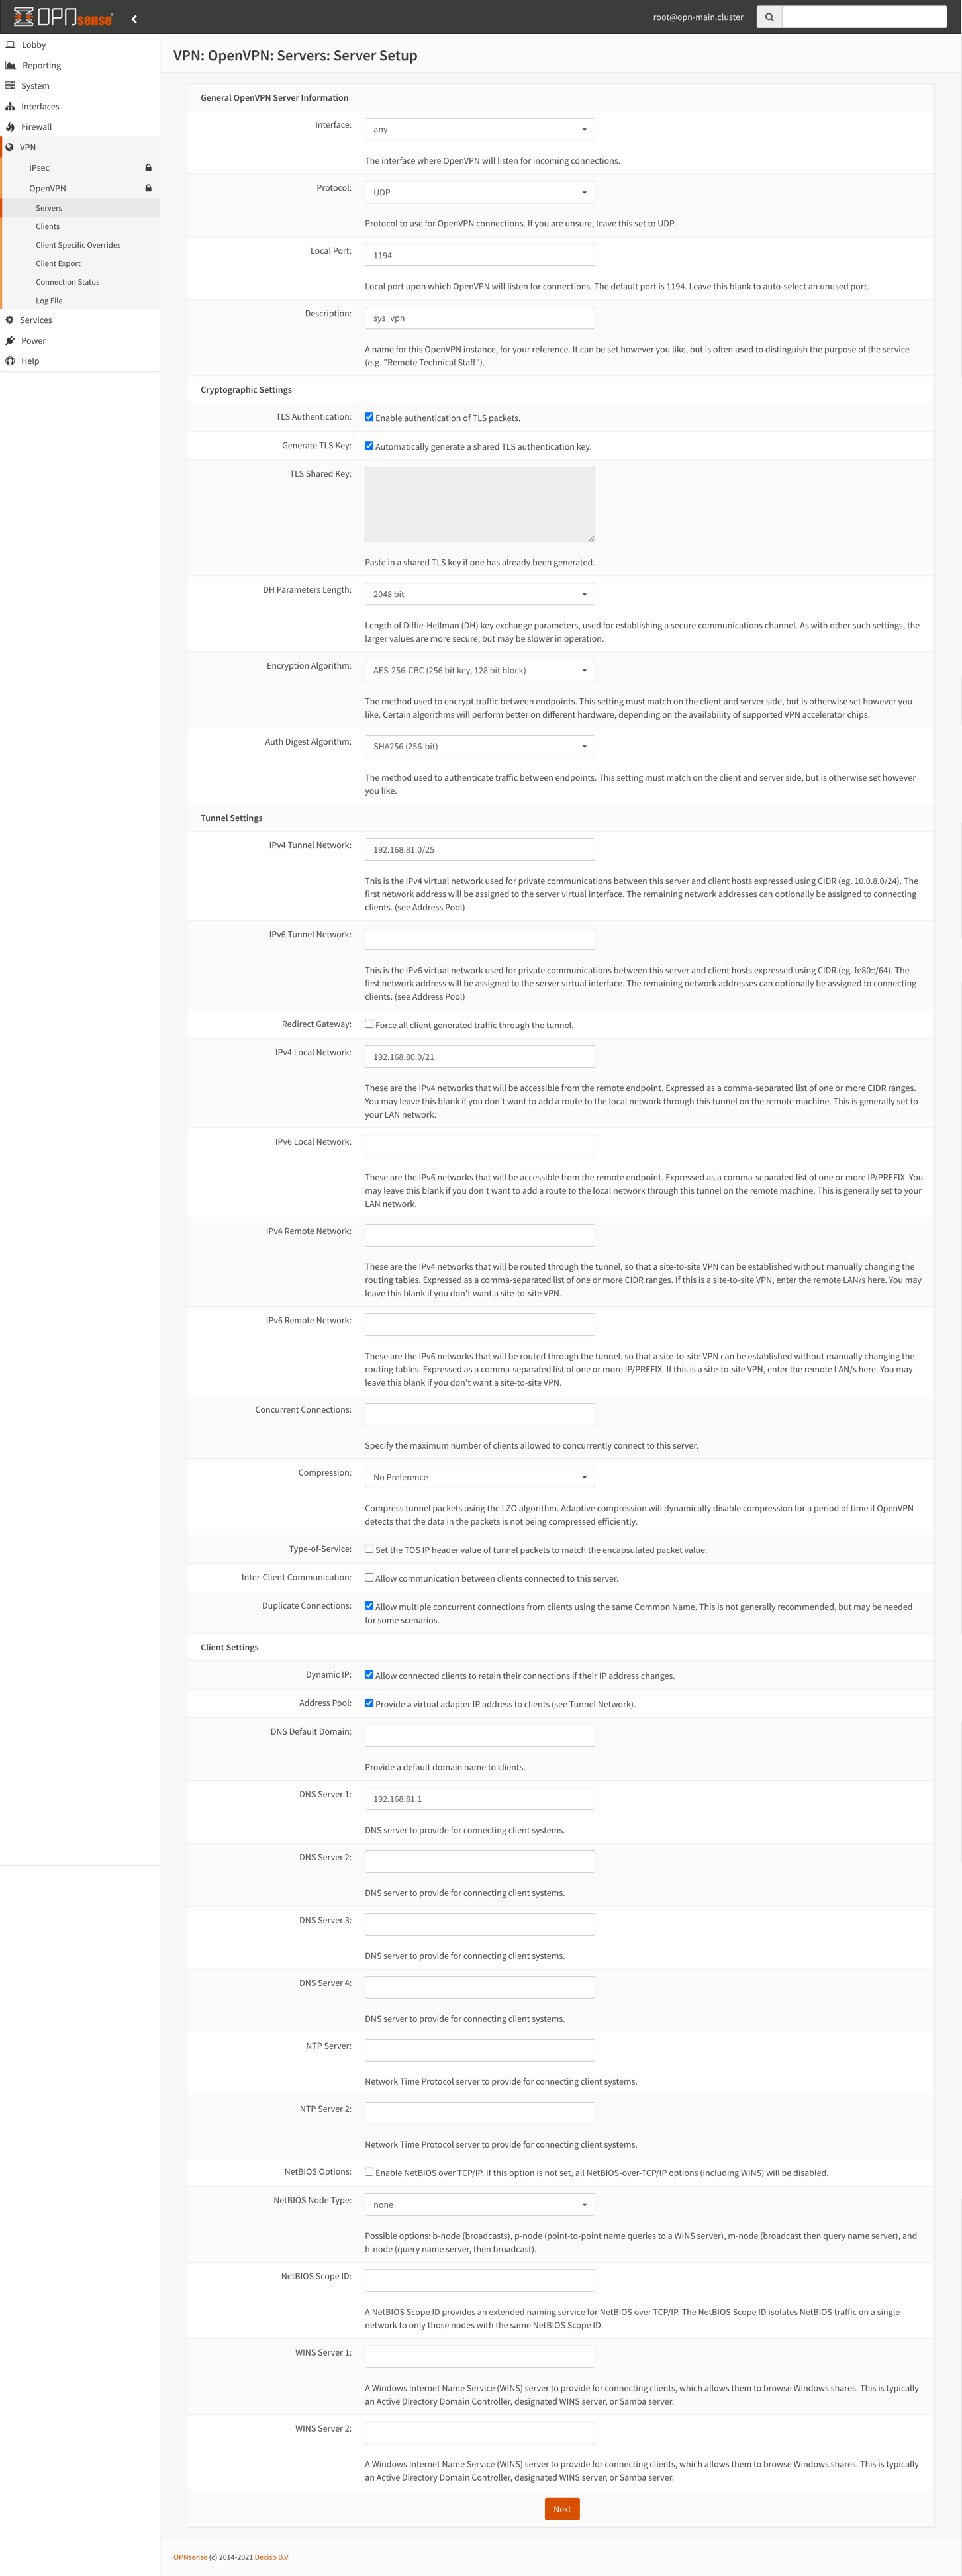
Set the following server settings:
- Interface:
any - Protocol
UDP - Local Port:
1194 - Description:
sys_vpn - Encryption Algorithm:
AES-256-CBC (256 bit key, 128 bit block) - Auth Digest Algorithm:
SHA256 (256-bit) - IPv4 Tunnel Network:
192.168.81.0/25 - IPv4 Local Network:
192.168.80.0/21 - Duplicate Connections:
CheckedCheck Allow multiple concurrent connections - DNS Server 1:
192.168.81.1

- Interface:
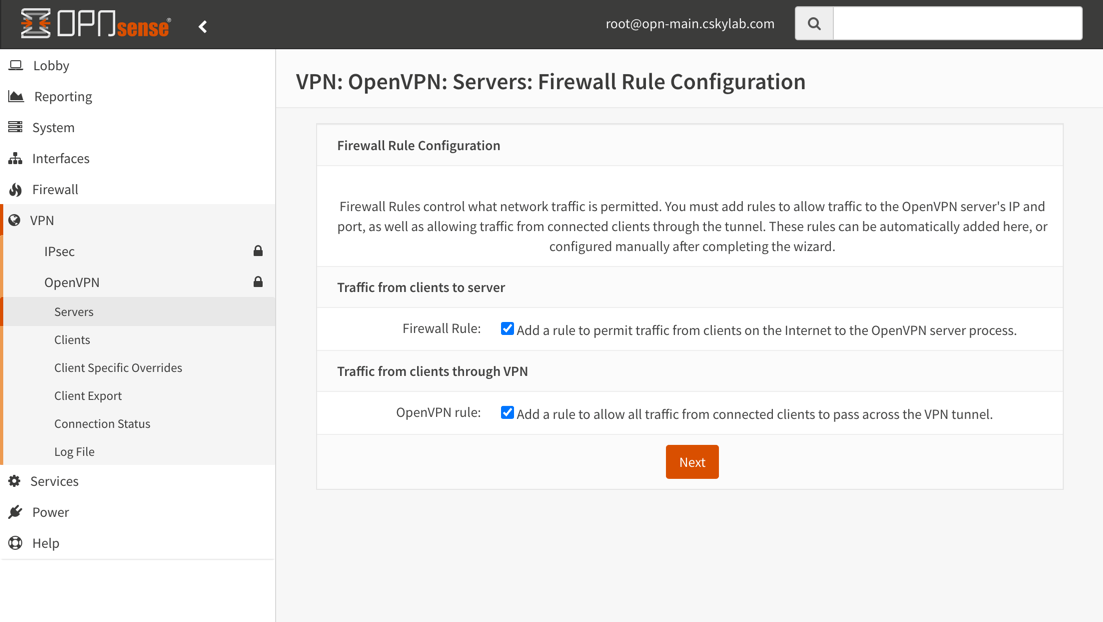
Firewall Rule Configuration: Check boxes to add
Firewall Rule&OpenVPN rule.
After configuration, go to System -> High Availability -> Status and click button
Synchronizeto synchronize config to backup.
Add VPN Users
Connecting to an OPNsense OpenVPN server requires both a user certificate and username and password. You need to create a user account for each person you want to allow access to your server.
To create a new user, go to System -> Access -> Users and set the following settings:
Enter the unique username and password for the account as well as other basic user information. Tick the box
Click to create a user certificatefurther down.
Create a user certificate with the following settings:
After configuration, go to System -> High Availability -> Status and click button
Synchronizeto synchronize config to backup.
Export OpenVPN User Profile
OPNsense makes client configuration extremely easy by providing ready to go connections for various devices, including connections specifically prepared for OpenVPN Connect and Viscosity.
To export OpenVPN user profile, go to VPN -> OpenVPN -> Client Export
Check aproppriate hostname (VIP WAN IP or FQDN) and port values (The local port used by the OpenVPN server).
Choose VPN Client type: In Export Type choose
File Onlyfor OpenVPN Connect orViscosity (visz)for Viscosity.Click the download button for the user profile to download.
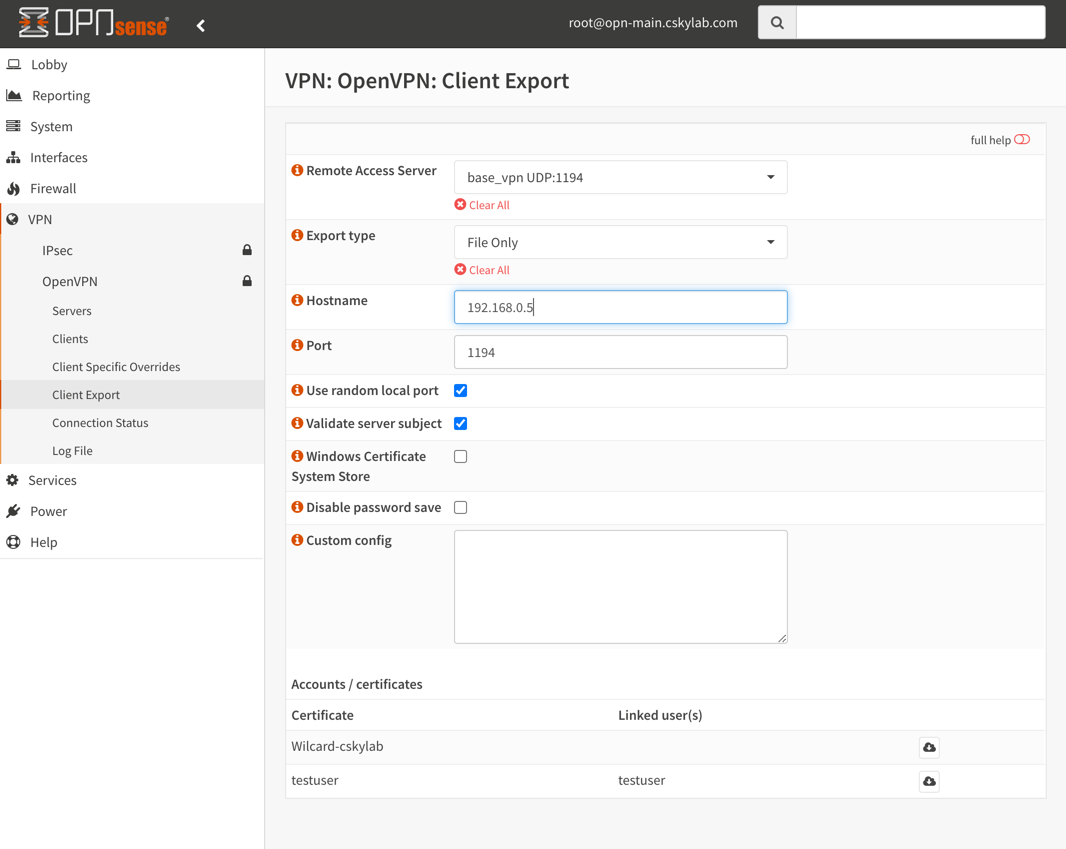
Note: You can send the downloaded profile file as an attachment, in an email message to the user. The user must import the profile with the client application (OpenVPN Connect or Viscosity) and test the connection from mobile and desktop environments.
Publishing (Port forwarding) rules
Note: This service is configured in
opn.genesisconfiguration according to the described procedures. You can use them to change the default configuration if needed.
Prerequisites:
Public Address: WAN interface on your opnsense firewall must have a public IP address assigned. If not, a previous port forwarding rule must have been configured in your uplink router, in order to redirect the traffic to opnsense firewall. It is recommended to set a global rule for all protocols / all ports in your uplink router and perform further publishing configuration in your opnsense firewall.
DNS Record: The service must have an appropriate host record or a CNAME published on its domain zone. If DDNS is needed see procedures in: Dynamic DNS
You can check if DNS resolution is working with
dig myservice.mydomain.com.
Kubernetes ingress services
All kubernetes ingress services are published with a single rule.
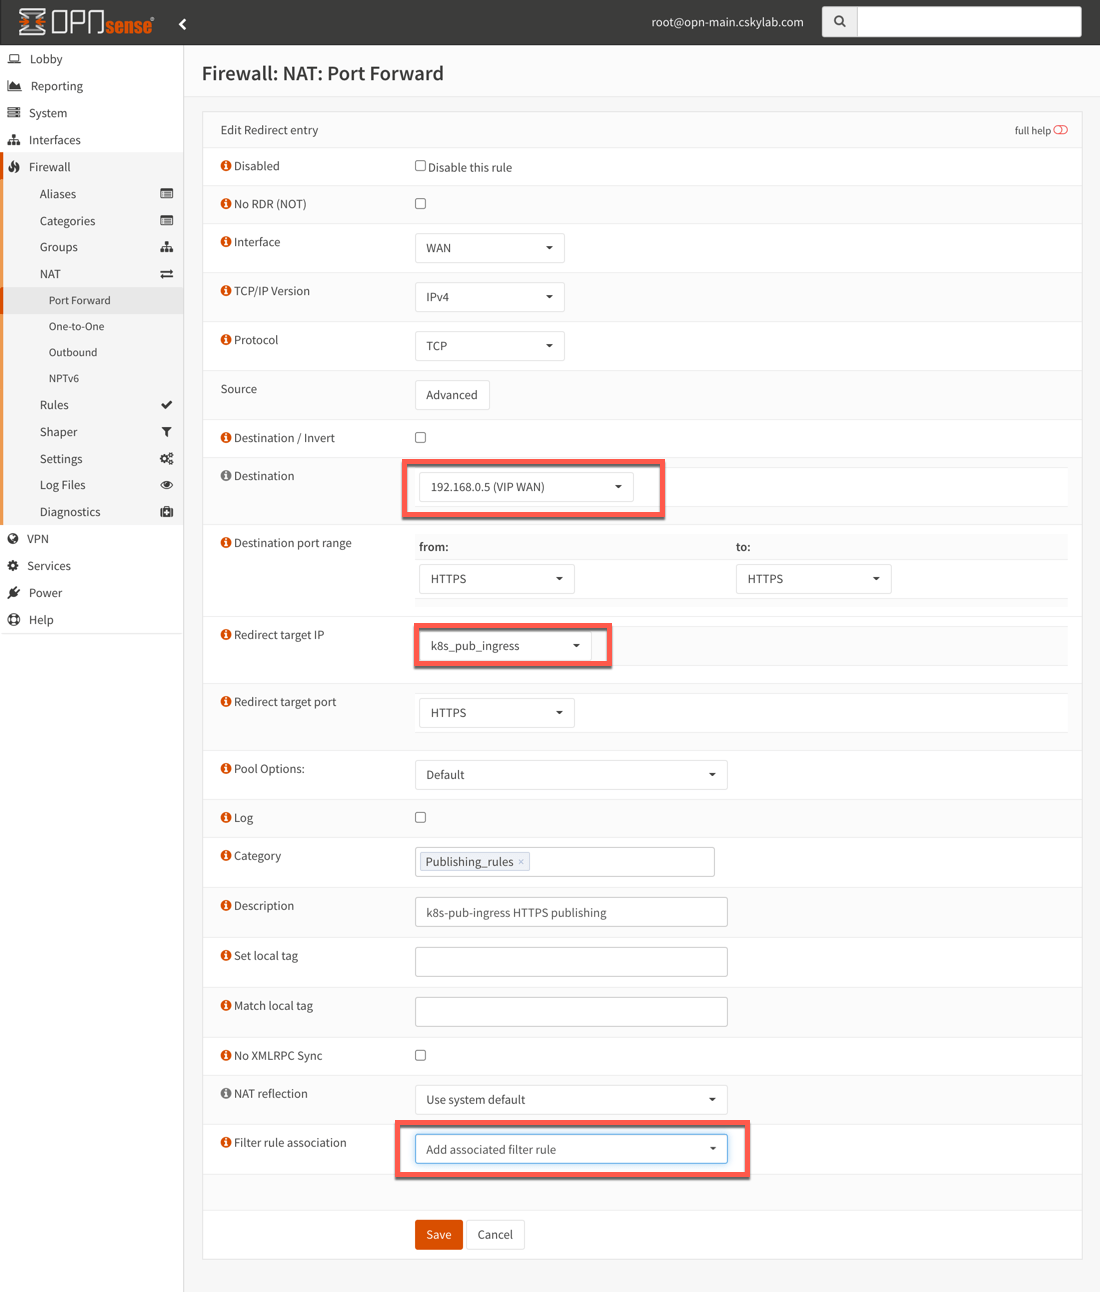
To publish kubernetes ingress k8s_pub_ingress:
Alias k8s_pub_ingress: Go to Firewall -> Aliases and create an alias if needed with the ingress service internal address (192.168.83.20)

Port forward rule: Go to Firewall -> NAT -> Port Forward and add the following rules.
NOTE:
Destinationis VIP WAN andRedirect target IPis internal k8s_pub_ingress address. Associated firewall rules are automatically generated and maintained in WAN interface.- HTTP:
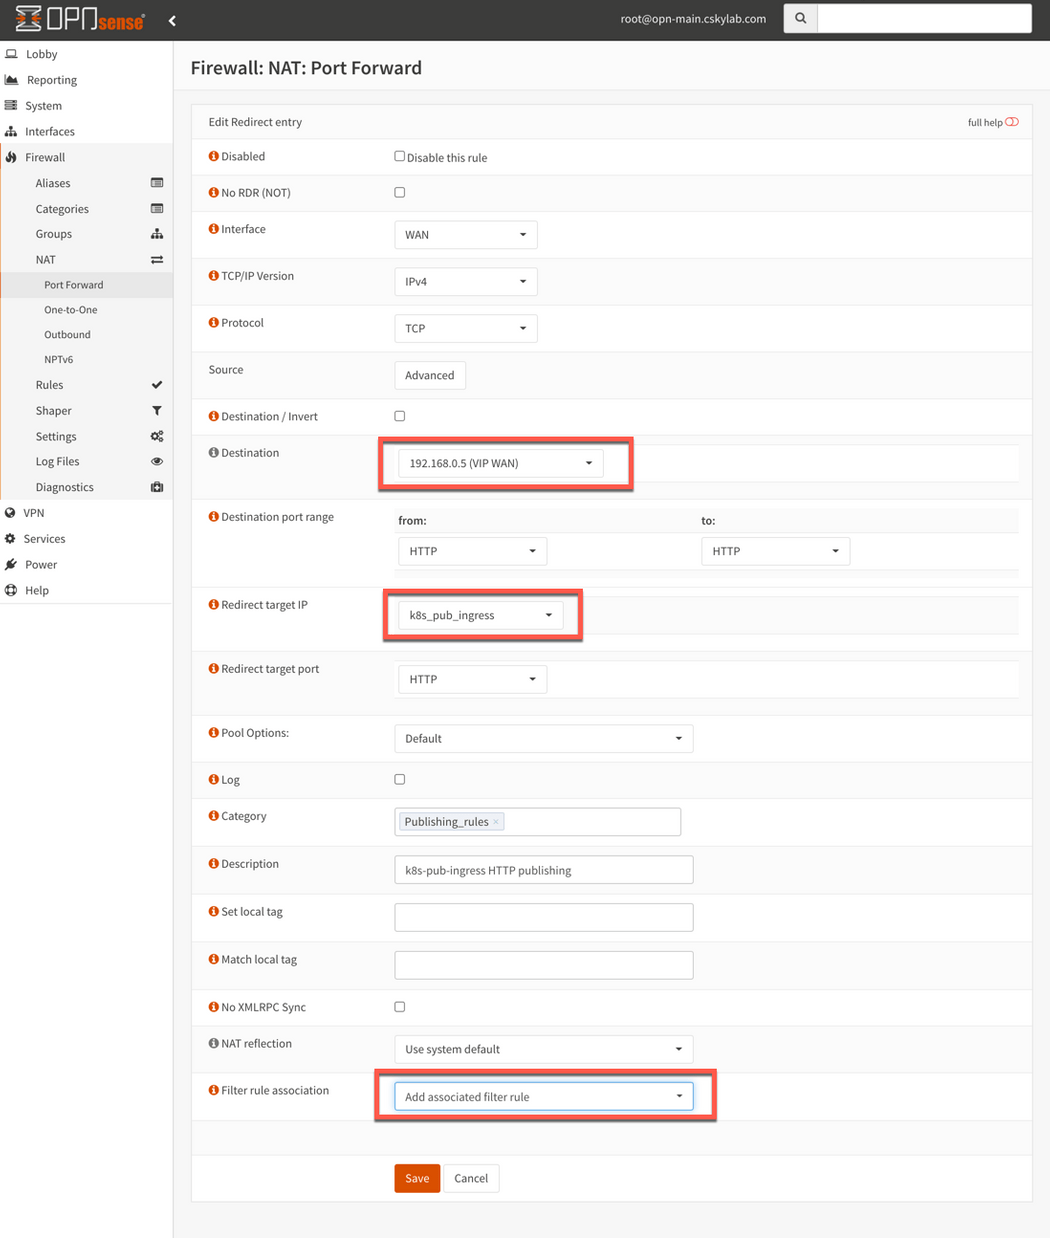
- HTTPS:
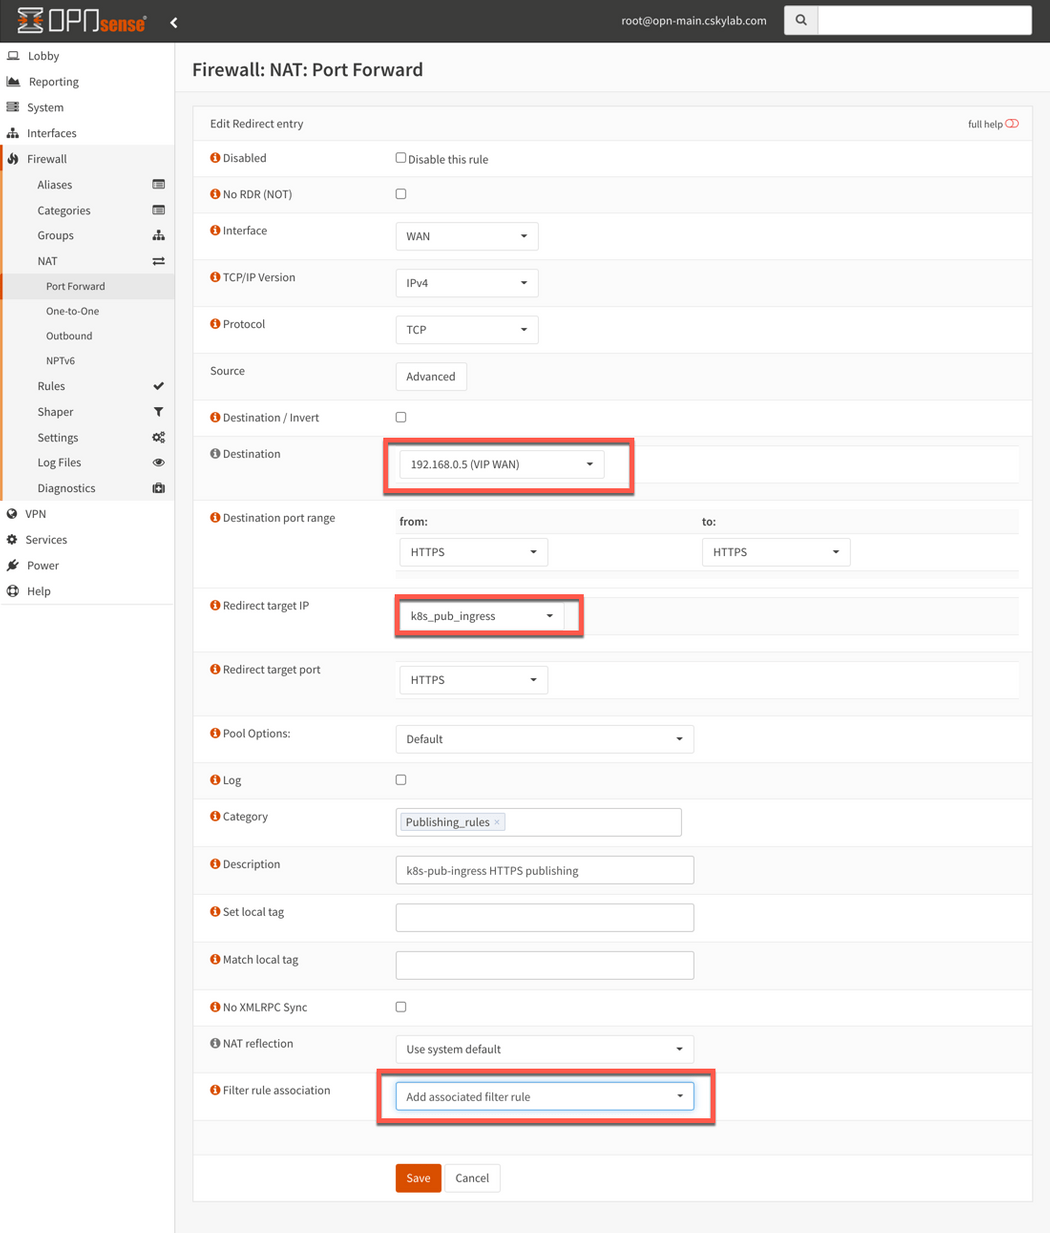
- HTTP:

RFC1918 static routes (optional)
When using an internal gateway to connect with internal corporate networks, you must add a gateway and configure routes for RFC1918 addresses or other specific internal CIDR's.
Internal corporate router must be connected with an interface to base network (192.168.80.0/24).
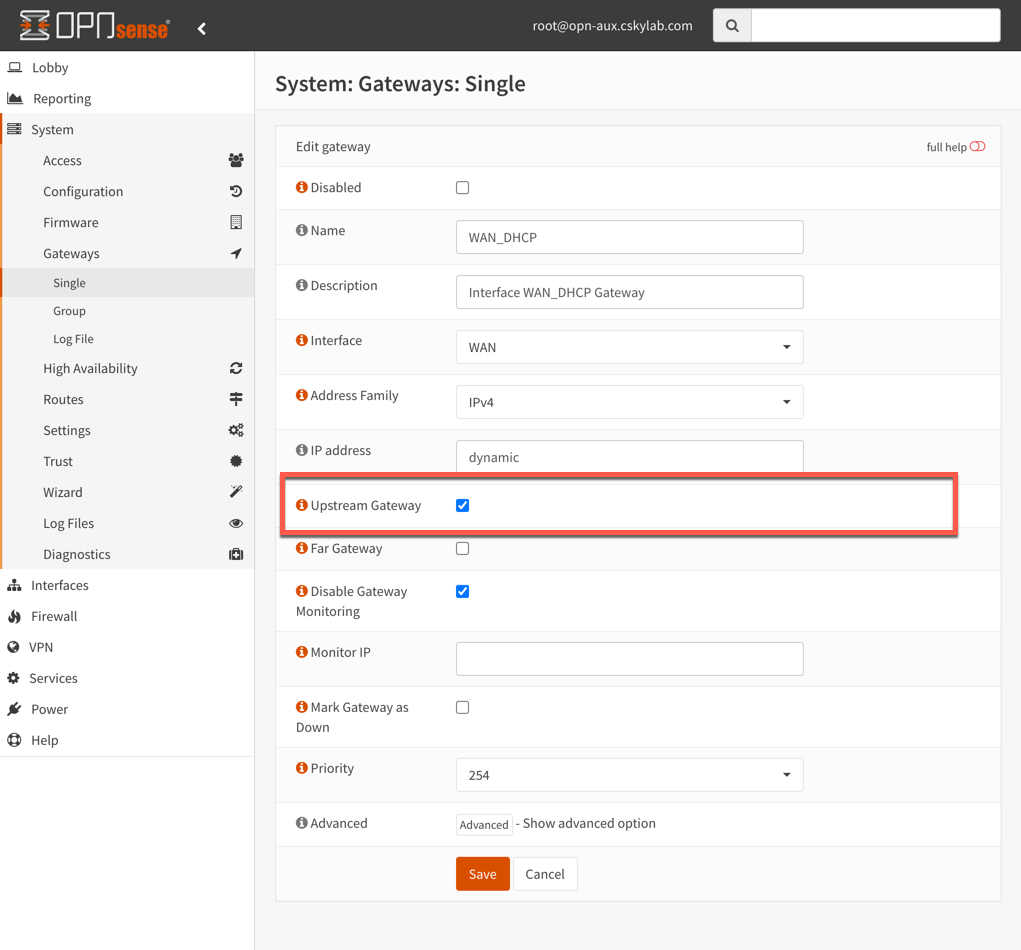
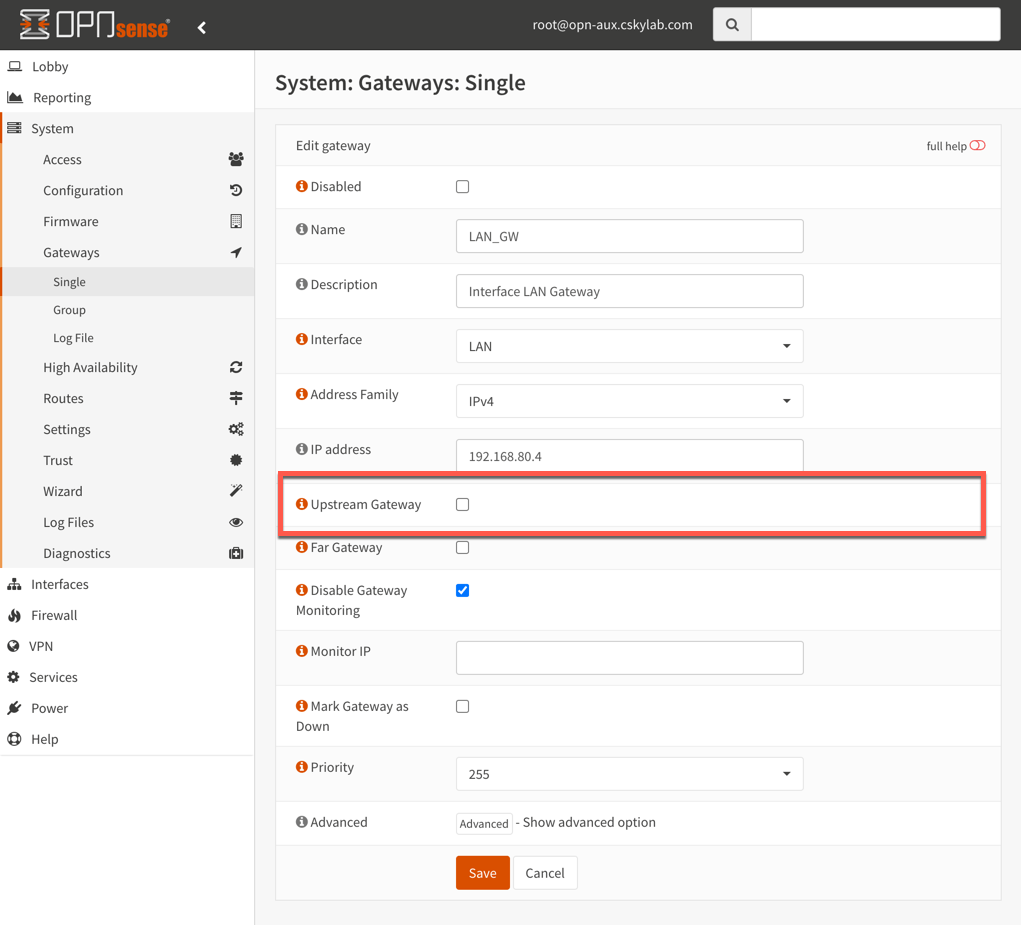
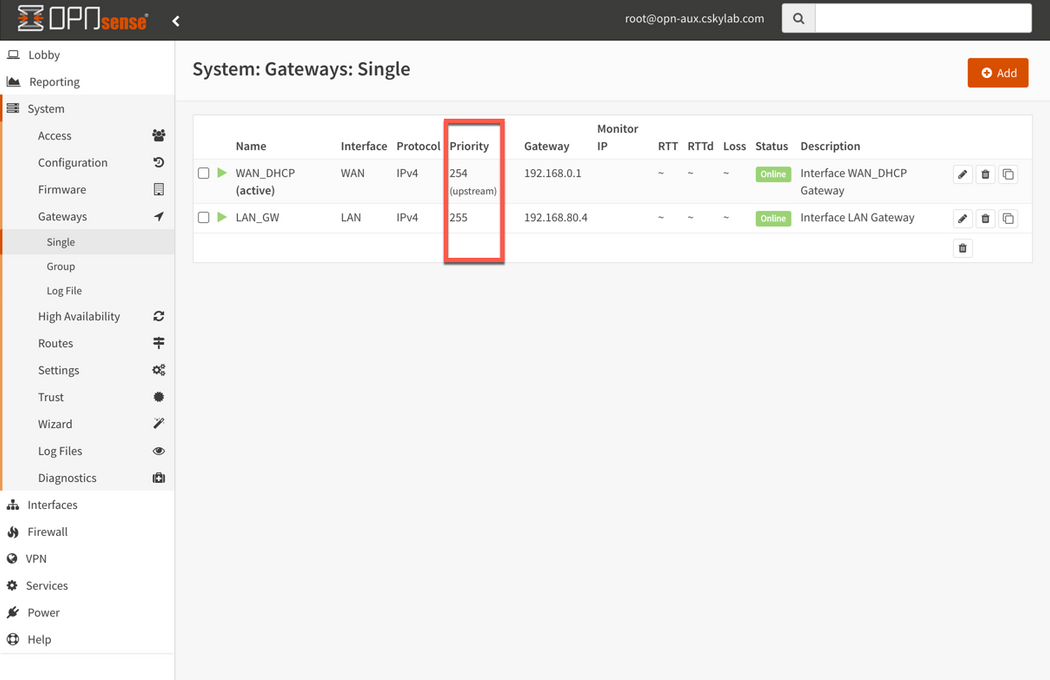
To add a Gateway for internal networks (Gateway may exist if configured previously from console):
- Go to System -> Gateways -> Single
- Add
LAN_GWgateway inLANinterface with IP address192.168.80.4(example address)
- Add
- Go to System -> Gateways -> Single
To add routes for RFC1918 addresses:
- Go to System -> Routes -> Configuration
- Add route for network address
10.0.0.0/8via gatewayLAN_GW - 192.168.80.4 - Add route for network address
172.16.0.0/12via gatewayLAN_GW - 192.168.80.4 - Add route for network address
192.168.0.0/16via gatewayLAN_GW - 192.168.80.4 - Apply configuration
- Add route for network address
- Go to System -> Routes -> Configuration
Be sure the only upstream gateway is WAN in System -> Gateways -> Single

At this point, the GUI administration tool should be accessible from all internal networks.
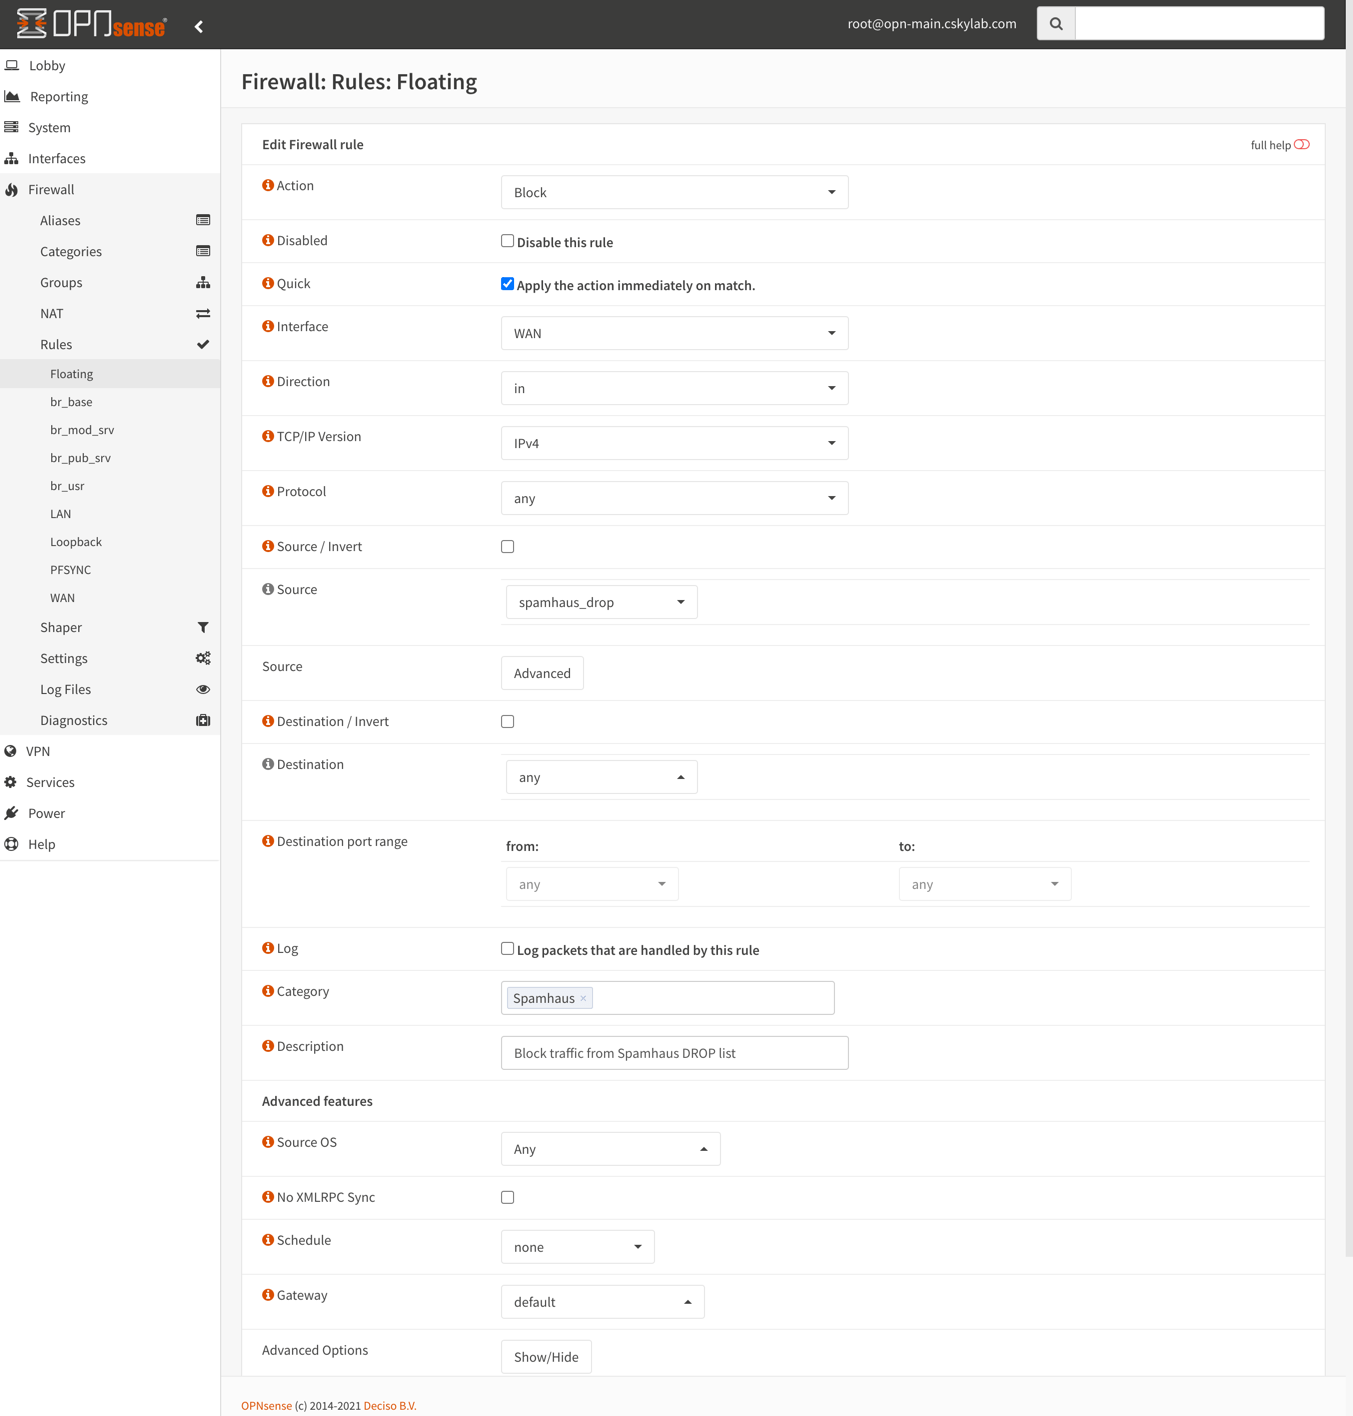
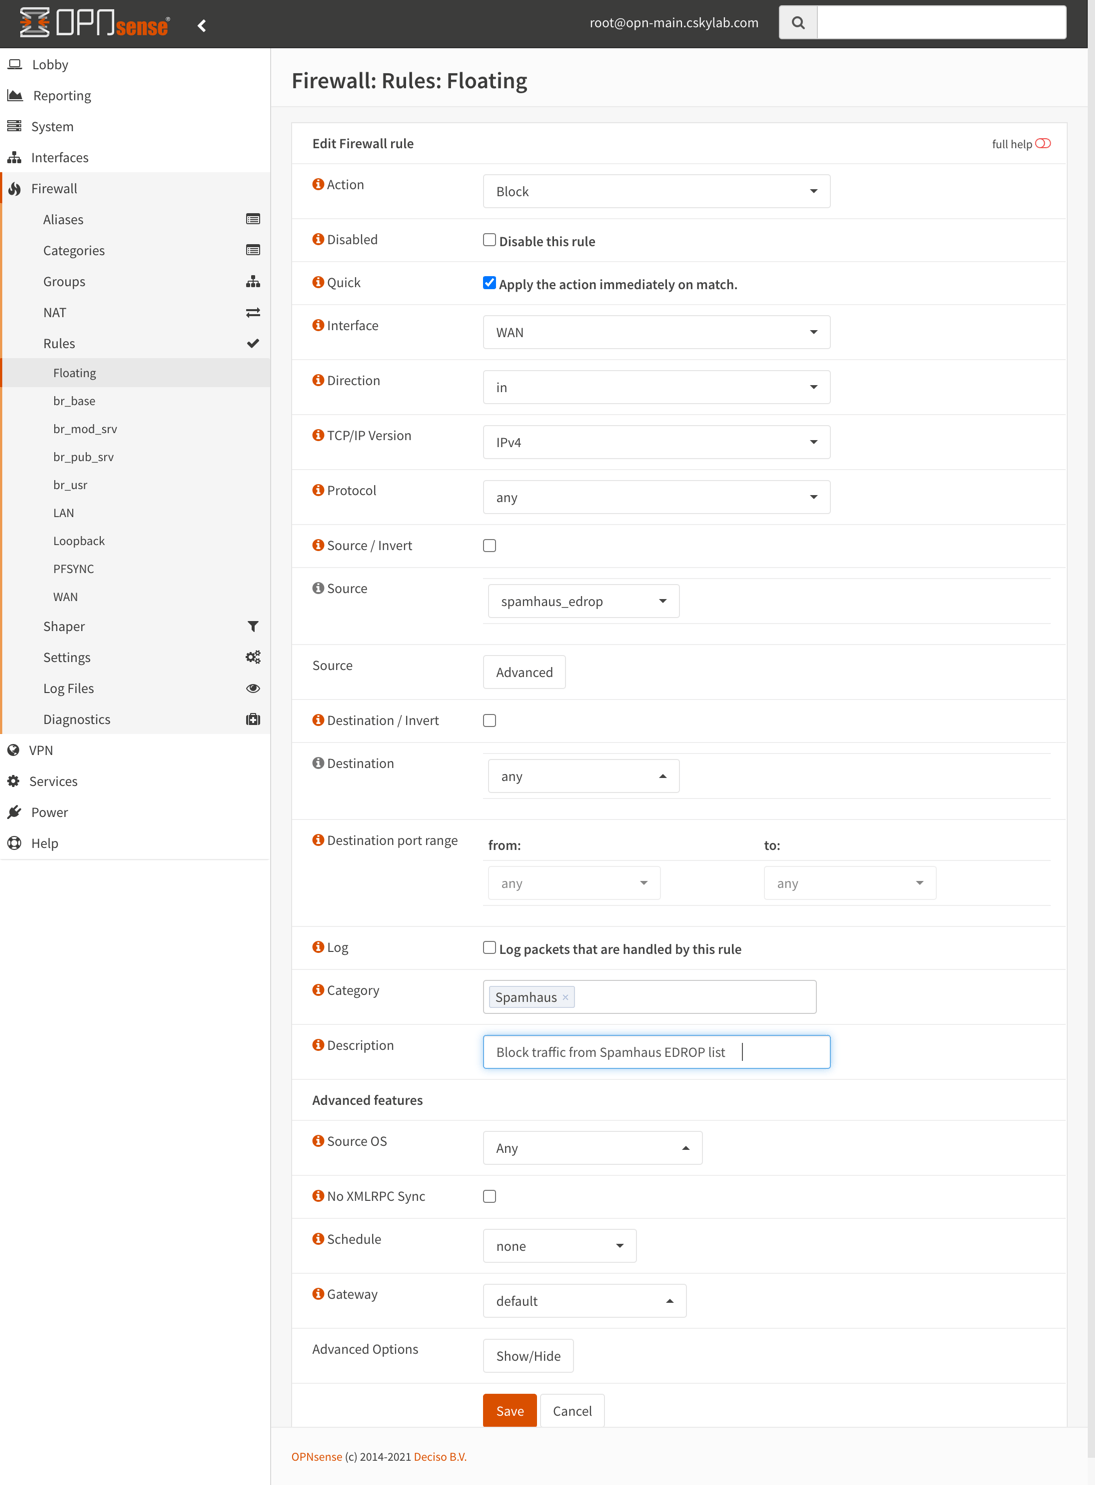
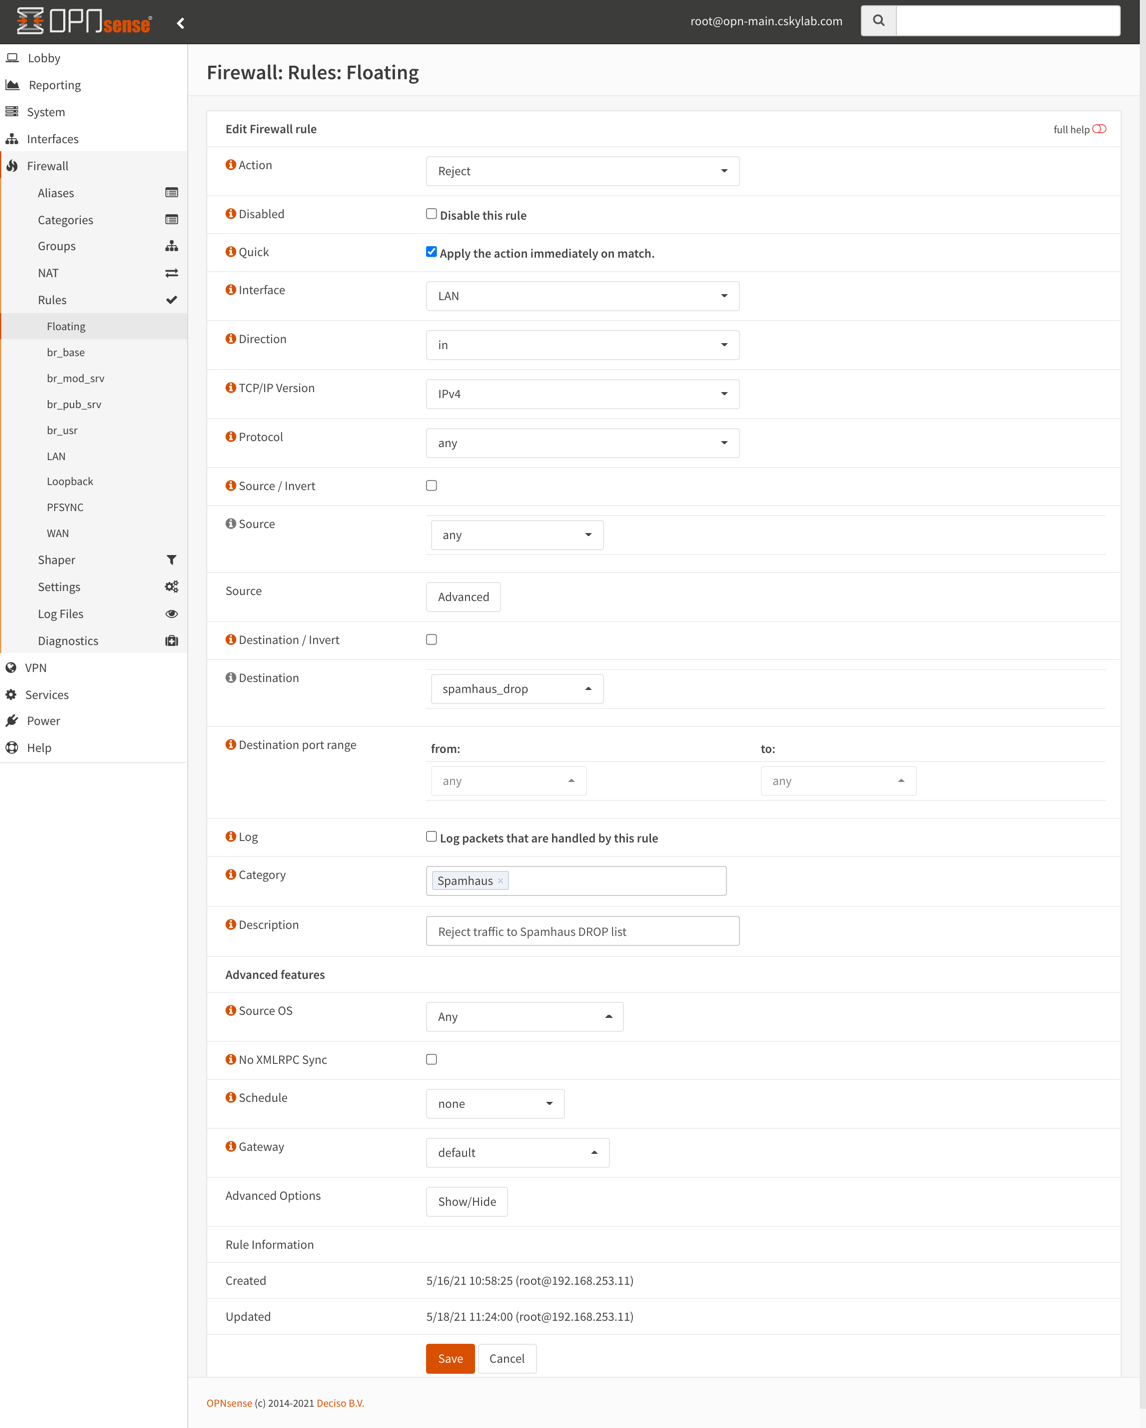
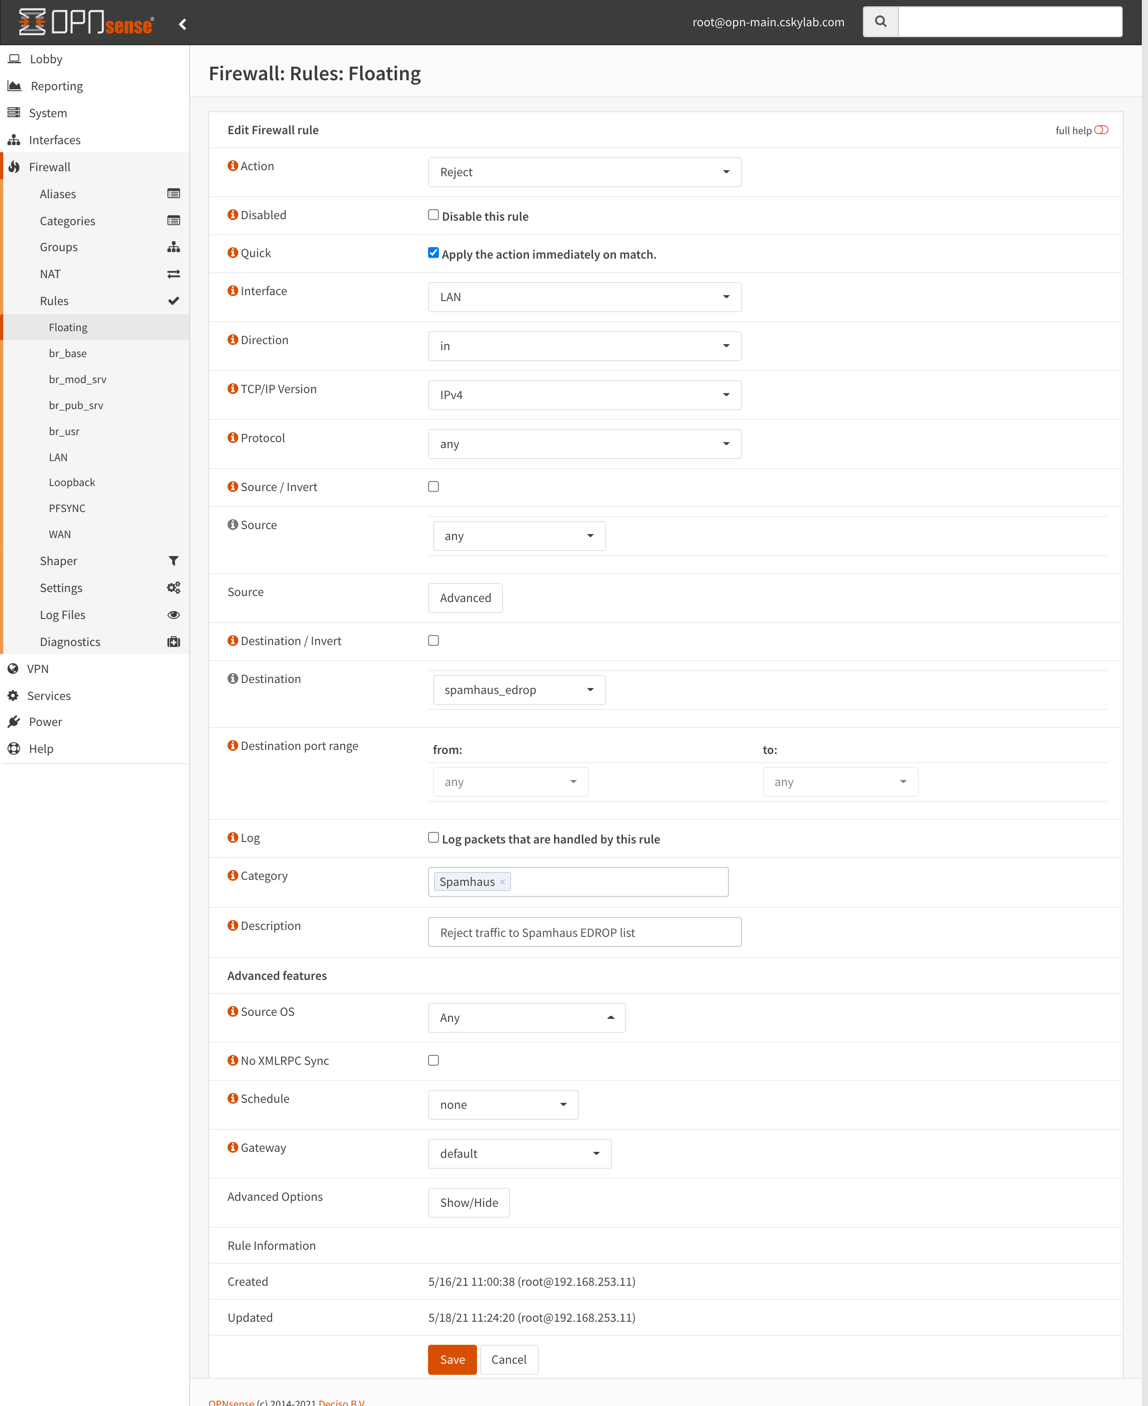
Spamhaus (E)DROP configuration
Note: This service is configured in
opn.genesisconfiguration according to the described procedures. You can use them to change the default configuration if needed.
DROP (Don’t Route Or Peer) and EDROP are advisory “drop all traffic” lists, consisting of netblocks that are “hijacked” or leased by professional spam or cyber-crime operations (used for dissemination of malware, trojan downloaders, botnet controllers).
For more information to configure Spamhaus lists see: https://docs.opnsense.org/manual/how-tos/edrop.html
Note: These rules are located in Floating section, to be applied always before regular interface rules.
You should define the following aliases:
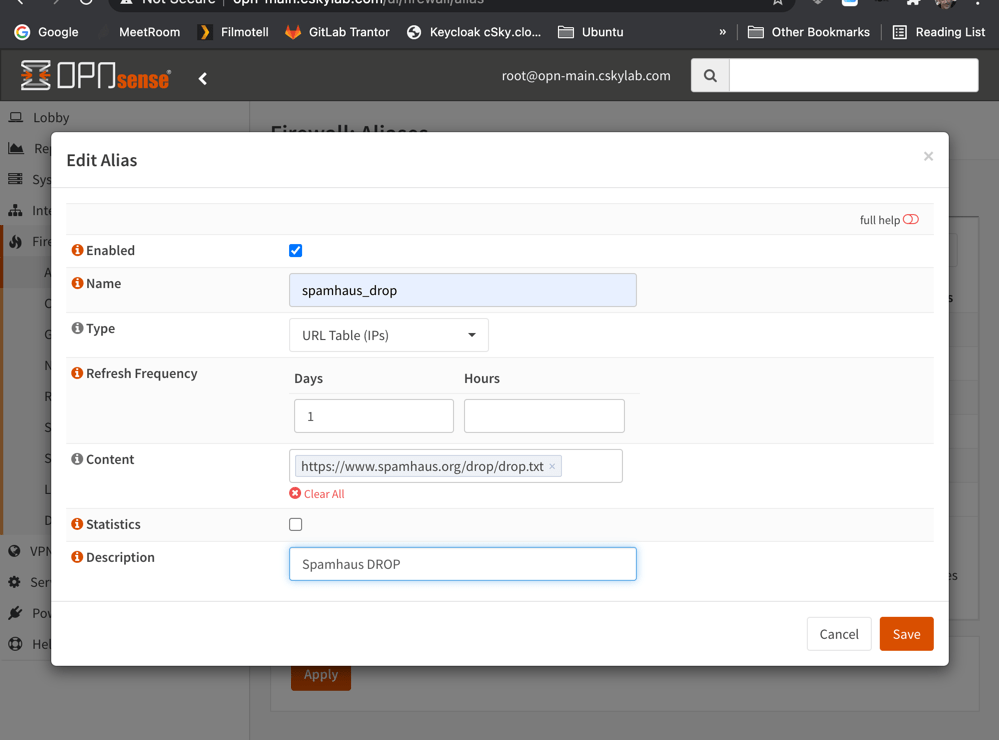
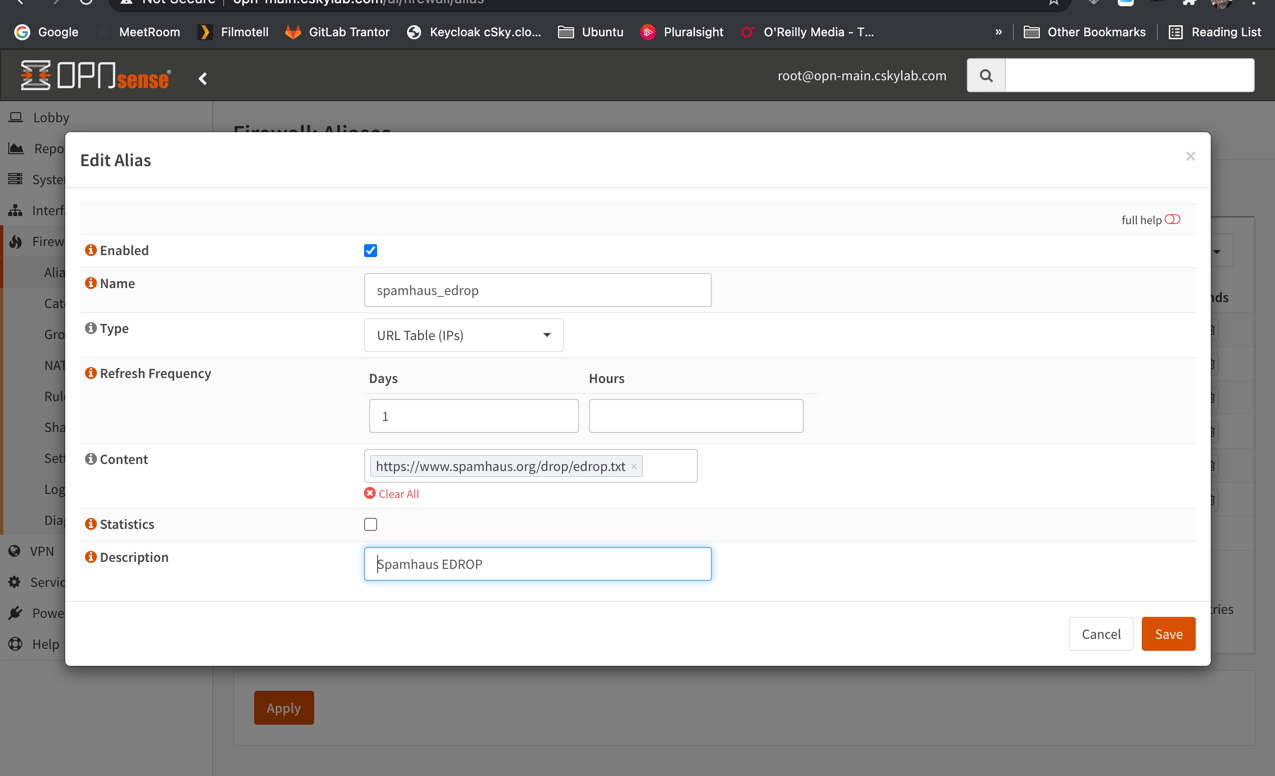
To set rules, go to Firewall -> Rules -> Floating and set the following:
Inbound rule for
spamhaus_droplist: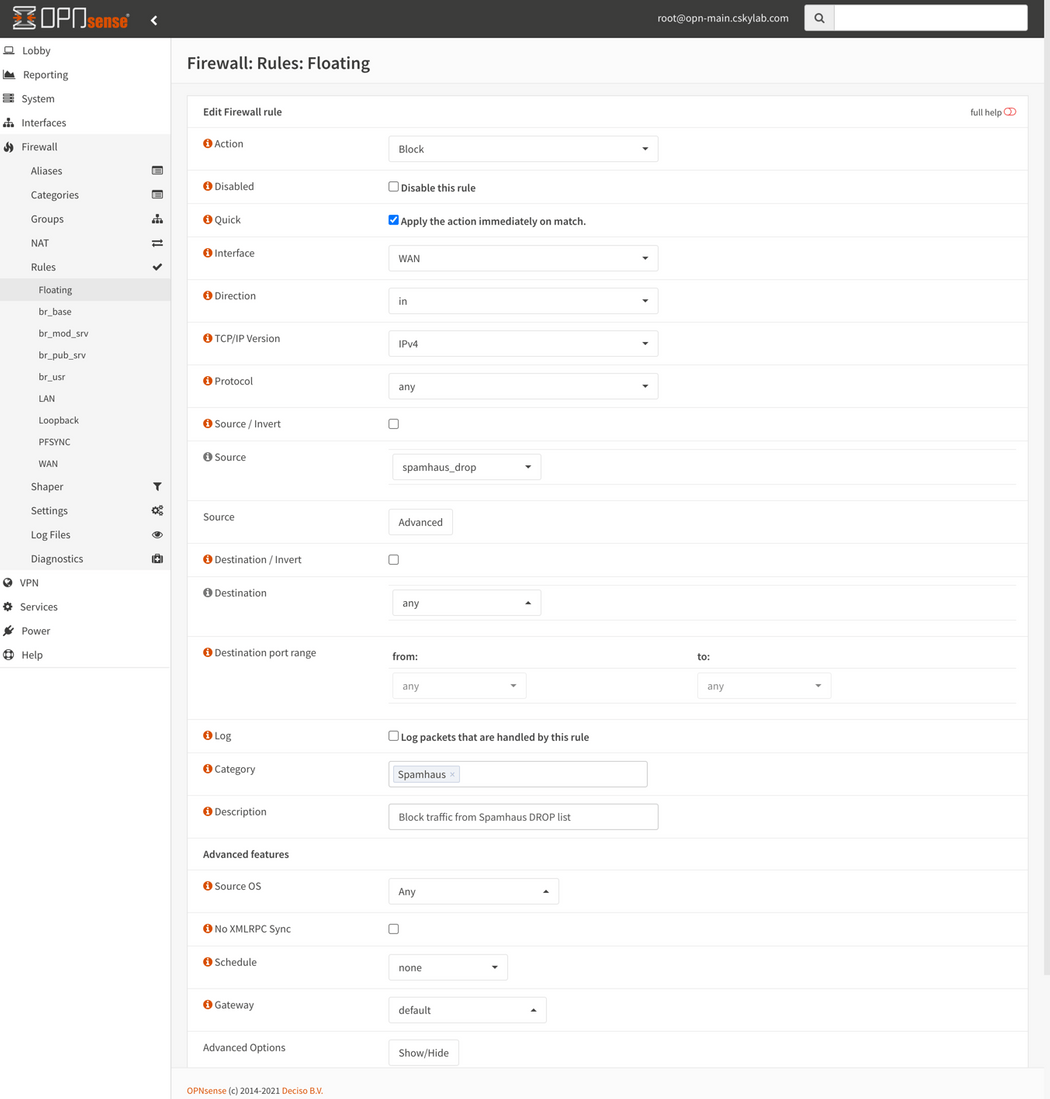
Inbound rule for
spamhaus_edroplist:
Outbound rule for
spamhaus_droplist::
Outbound rule for
spamhaus_edroplist::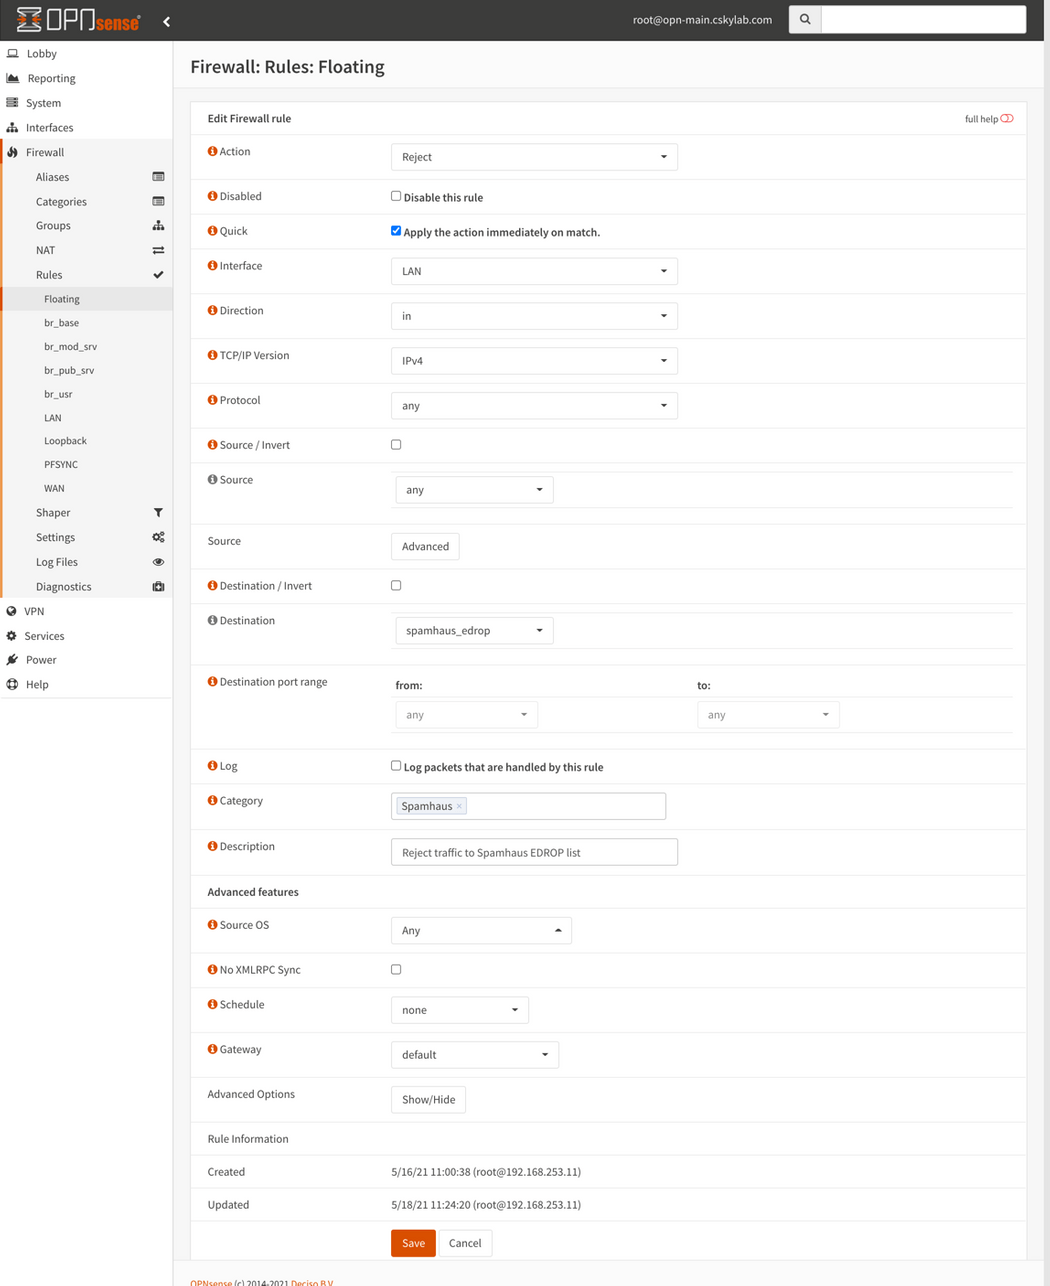
Virtual IPs
On Master Firewall, go to Interfaces -> Virtual IPs -> Settings and create the following virtual IPs with the following parameters:
- Mode: CARP
- Interface:
xxxx - Address: X.X.X.X/X
- VHID Group: Select an unassigned VHID
- Virtual password: Use VIP password (Random password of 30 characters).
Utilities
Passwords and secrets
Generate passwords and secrets with:
# Screenecho $(head -c 512 /dev/urandom | LC_ALL=C tr -cd 'a-zA-Z0-9' | head -c 16)# File (without newline)printf $(head -c 512 /dev/urandom | LC_ALL=C tr -cd 'a-zA-Z0-9' | head -c 16) > RESTIC-PASS.txt
Change the parameter head -c 16 according with the desired length of the secret.